Homemade Red Velvet Sugar Cookies: The Ultimate Cut-Out Recipe for Any Occasion
Forget your traditional sugar cookie recipe and prepare to elevate your baking game with these incredible homemade Red Velvet Sugar Cookies. Crafted from scratch, these vibrant red cookies offer a delightful twist on a classic, infusing the subtle chocolatey notes and signature hue of red velvet cake into a perfectly tender sugar cookie. Whether you’re celebrating Valentine’s Day with heart-shaped treats or adding a splash of festive color to your Christmas cookie tray, these cut-out cookies are as fun to make as they are to decorate. Finish them off with an elegant chocolate drizzle or our easy-to-make, eggless royal icing for a truly impressive homemade touch.

Red velvet is more than just a color; it’s a flavor profile that evokes a sense of indulgence and warmth. It’s one of those distinctive tastes that people tend to either adore or shy away from. While a bad experience with red velvet coffee once scarred my palate (seriously, just say no to that concoction!), my love for the classic dessert remains strong. Fortunately, my journey with red velvet has been filled with many triumphs, from a delightful small red velvet cake and small batch red velvet cupcakes to a decadent red velvet Oreo cheesecake and gooey red velvet lava cakes. And now, I’m thrilled to share with you these irresistible Red Velvet Sugar Cookies.
This recipe transforms the beloved red velvet cake experience into a playful and delicious cut-out cookie format. Imagine the joy of shaping these vibrant cookies with your favorite cutters and adorning them with festive sprinkles. They’re particularly popular as heart-shaped treats for Valentine’s Day, and their striking red color makes them a perfect, eye-catching addition to any Christmas cookie tray, instantly adding a touch of holiday cheer.
To make decorating these beauties a breeze, I’ve opted for a simple yet elegant chocolate drizzle, but I’ve also included a comprehensive recipe for an eggless royal icing. This means you can achieve that classic, beautifully piped cookie look without the fuss of dealing with raw egg whites or specialty meringue powder. And of course, no festive cookie is complete without a generous showering of sprinkles!

Essential Ingredients for Perfect Red Velvet Sugar Cookies
Crafting your own batch of delicious red velvet sugar cookies requires a selection of common baking ingredients, each playing a crucial role in achieving the perfect texture and flavor. Here’s a closer look at what you’ll need:
- All-Purpose Flour: This foundational ingredient provides the necessary structure for your cookie dough. It’s what allows the cookies to hold their shape when rolled and cut, ensuring they don’t become crumbly or spread excessively during baking. Using the right amount is key for a tender yet sturdy cookie.
- Unsweetened Cocoa Powder: This is where the “chocolate” in red velvet comes from. Unlike a rich chocolate cookie, red velvet relies on a subtle hint of cocoa, which, when combined with vanilla, creates that unique flavor profile. Make sure to use unsweetened cocoa powder to control the sweetness of your cookies.
- Baking Powder: As a leavening agent, baking powder ensures your cookies have a slight lift and a tender crumb, preventing them from becoming dense or rock-hard. It reacts with moisture and heat to create tiny air pockets, contributing to a softer texture.
- Salt: Don’t underestimate the power of salt in baking! It balances the sweetness of the sugar and enhances all the other flavors, preventing your cookies from tasting bland. A little bit goes a long way to bring out the best in your red velvet cookies.
- Granulated Sugar: Beyond just sweetening the dough, sugar also contributes to the tender texture of the cookies and helps them achieve that slightly crisp edge.
- Unsalted Butter: Butter is essential for flavor and tenderness. Using unsalted butter allows you to control the total amount of salt in your recipe. Ensure your butter is at room temperature for easy creaming with sugar, which is crucial for a light and airy dough.
- Large Egg: A standard large egg, ideally at room temperature, acts as a binder, helping to emulsify the ingredients and add structure and richness to the dough.
- Vanilla Extract: Vanilla is a vital flavor enhancer that complements the cocoa powder, contributing to the classic red velvet taste. Use a good quality pure vanilla extract for the best results.
- Red Food Coloring: This is what gives red velvet its signature, eye-catching hue. Liquid food coloring is commonly used and added by the drop. You can also use gel or paste food coloring for a more intense color with less liquid, but be aware that the amount needed will vary significantly from liquid drops. The key is to achieve a vibrant red that will still be noticeable after baking, as some color tends to fade slightly with heat.

Yield and Baking Times for Your Red Velvet Cut-Out Cookies
It’s always tricky to provide an exact yield for cut-out cookies, as the final count largely depends on the size and shape of your cookie cutters. However, with this red velvet sugar cookie recipe, I typically get around 12 large heart-shaped cookies. If you opt for smaller cookie cutters, you’ll naturally yield more cookies, making it a little more than a “small batch” but still a manageable amount for home baking.
The size of your cookies also directly impacts their baking time. Smaller cookies, for instance, may be perfectly baked in about 8 minutes, while larger ones might require closer to 10 minutes. To ensure even baking and prevent overdone edges, start checking your cookies around the 8-minute mark. Remove any that are firm around the edges and lightly set in the center, then continue baking the rest until they reach the same stage. It’s always better to slightly underbake than overbake for a tender cookie. If you’re short on time or prefer not to fuss with cutting out shapes, consider making my delicious Red Velvet Bars instead!
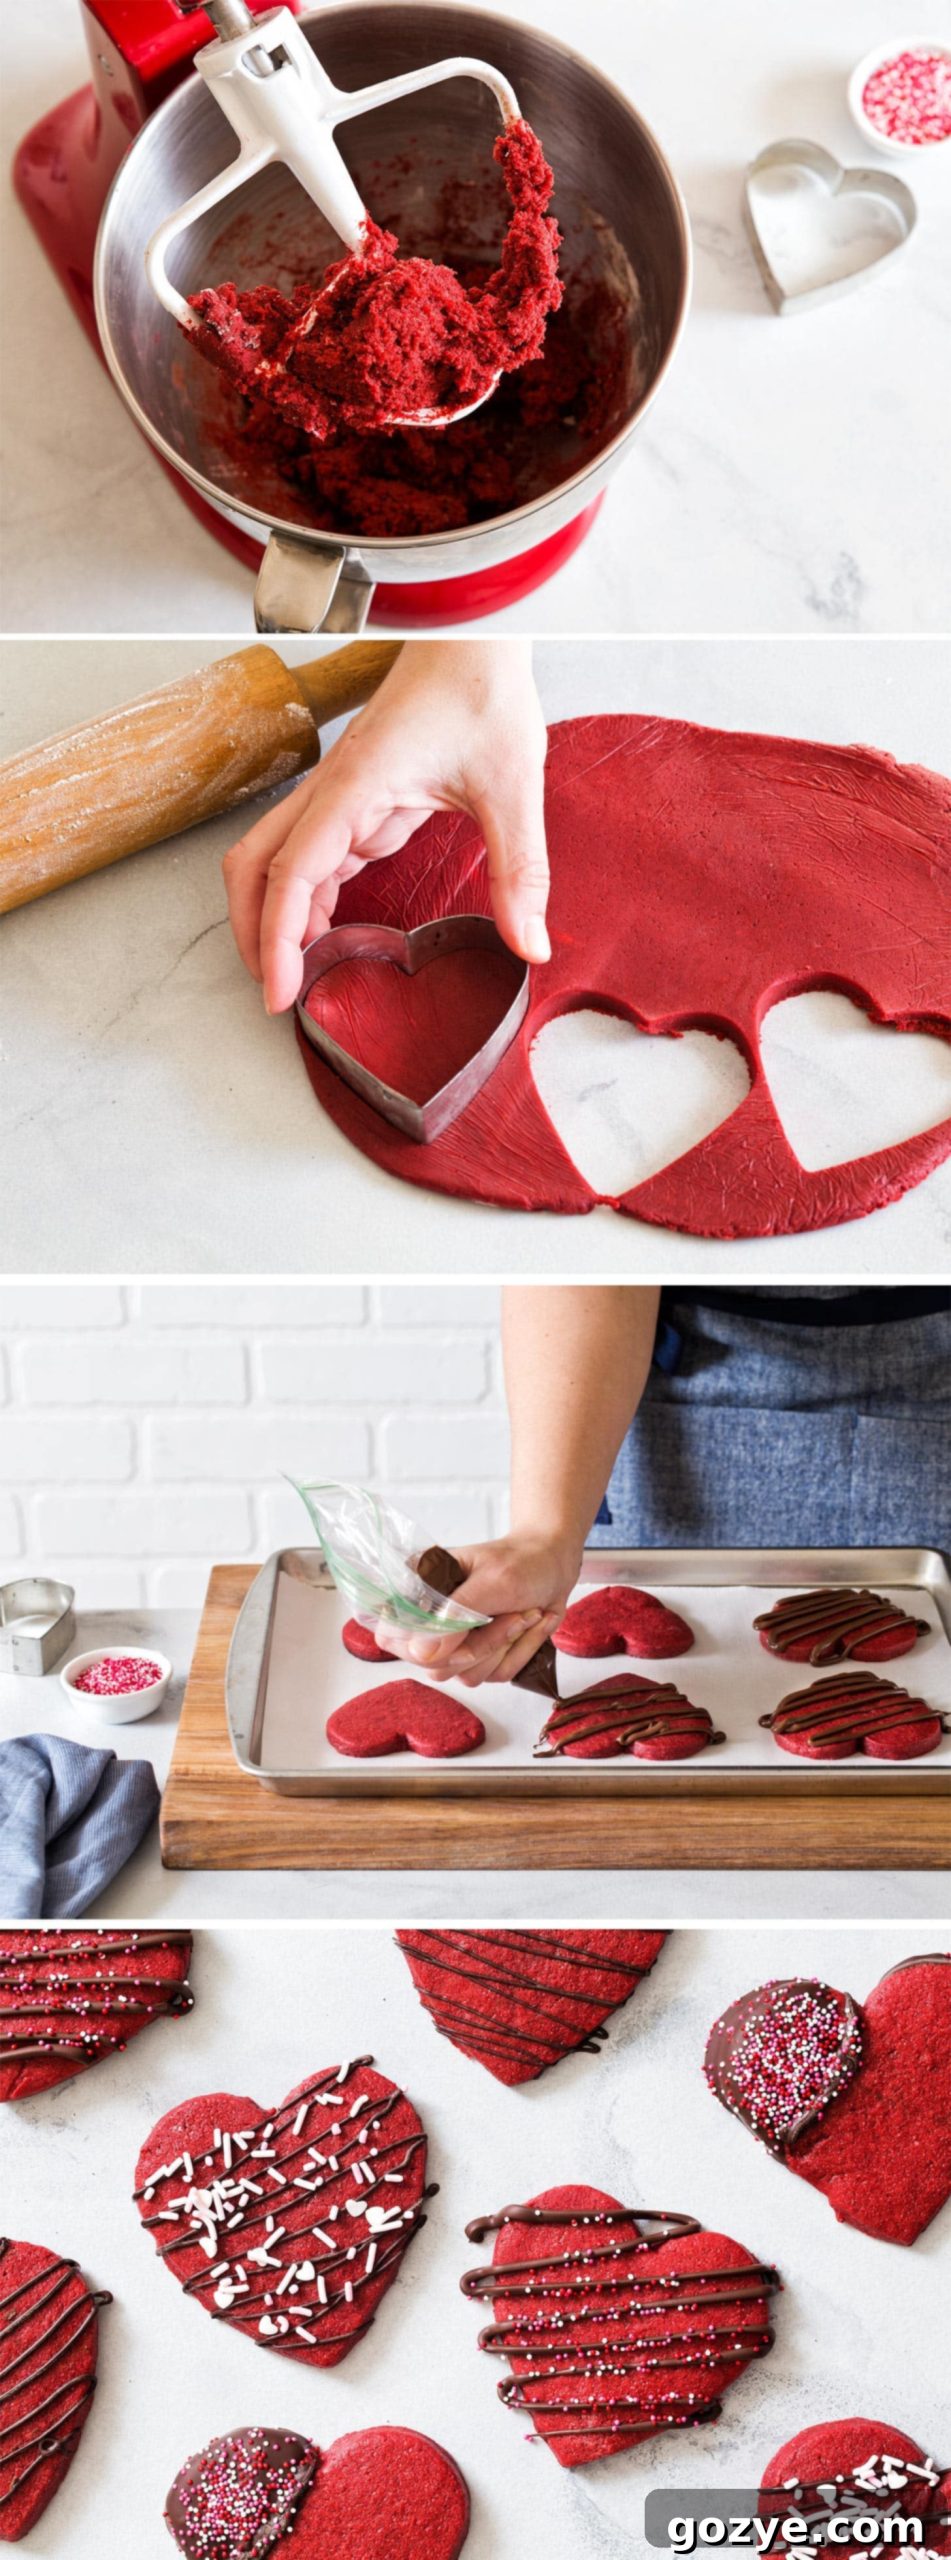
Step-by-Step: How To Make Red Velvet Sugar Cookies
Making these red velvet cut-out cookies is not only fun but also surprisingly straightforward. Follow these steps for a perfect batch:
- Whisk Dry Ingredients: In a medium-sized bowl, combine the all-purpose flour, cocoa powder, baking powder, and salt. Whisk them thoroughly for about 30 seconds. This step is crucial to ensure all the leavening agents and flavorings are evenly distributed throughout the dough, preventing pockets of unmixed ingredients.
- Cream Butter and Sugar: In a large mixing bowl (using a stand mixer with a paddle attachment or a hand mixer), beat the granulated sugar and softened unsalted butter together on medium-high speed. Continue beating for 1-2 minutes until the mixture is light, fluffy, and pale yellow. This creaming process incorporates air, which contributes to the cookies’ tender texture.
- Add Wet Ingredients: Scrape down the sides of the bowl to ensure everything is well combined. Then, add the room temperature egg, vanilla extract, and red food coloring. Beat on low speed until all ingredients are fully incorporated and the color is uniformly distributed, creating a vibrant red mixture.
- Form the Dough: Gradually add the whisked flour mixture to the wet ingredients, beating on low speed until a cohesive dough forms. Be careful not to overmix; stop as soon as the flour streaks disappear to prevent tough cookies.
- Chill the Dough: Divide the dough into two equal pieces. For easier rolling later, place each piece between two sheets of plastic wrap and roll it out immediately to about 1/4-inch thickness. This pre-rolling step saves you effort when the dough is cold. Refrigerate the flattened dough for at least 1 hour, or until it is firm enough to handle without sticking.
- Prepare for Baking: Preheat your oven to 350°F (175°C). Line 1 large or 2 small baking sheets with parchment paper for easy cleanup and to prevent sticking.
- Roll and Cut: Working with one piece of chilled dough at a time, place it on a lightly floured surface (or between two sheets of parchment paper if you pre-rolled). Cut out desired shapes using floured cookie cutters. Gather any scraps, gently re-roll them, and cut out more shapes until all the dough is used. If the dough becomes too warm and sticky, return it to the refrigerator for a few minutes.
- Bake: Carefully transfer the cut-out cookies to the prepared baking sheets. Bake for 8-10 minutes, or until the edges are firm and lightly golden, and the centers are set. Baking times will vary based on cookie size, so watch them closely.
- Cool and Decorate: Allow the cookies to cool on the baking sheet for 5 minutes before transferring them to a wire rack to cool completely. Once fully cooled, they are ready for your choice of decoration.
Store your delicious red velvet sugar cookies in an airtight container at room temperature for up to 1-2 weeks. If decorated with frosting, especially royal icing, it’s best to store them in a single layer to prevent any delicate designs from being squashed.

Expert Tips for Rolling Out Cookie Dough Without Sticking
There’s nothing more frustrating in baking than having your beautifully mixed cookie dough stick stubbornly to your rolling pin, countertop, and cookie cutters before it even makes it to the oven. The ultimate secret to perfectly rolled, non-sticky dough lies in keeping it cold. But here’s an insider trick to make the process even smoother: pre-roll your dough between two sheets of plastic wrap *before* you chill it.
Here’s why this method is a game-changer:
- Easier Rolling: Room temperature dough is significantly easier to roll out evenly than cold, stiff dough. If you wait until the dough is cold, you’ll have to exert more effort and wait for it to soften slightly, increasing the time you spend handling it.
- Reduced Handling: The more you handle cookie dough, the warmer it gets, and the warmer it gets, the stickier it becomes. By pre-rolling the dough to its desired 1/4-inch thickness while it’s still pliable, you minimize the amount of time you need to work with it once it’s cold.
- Immediate Cutting: When your pre-rolled dough comes straight out of the refrigerator, it’s already at the perfect thickness and temperature for cutting. This means you can quickly cut out your shapes with ease, wasting no time battling a sticky mess. The faster you can cut and get the cookies onto the baking sheet, the better the results.
If, for any reason, your dough starts to get warm or sticky while you’re cutting, simply pop it back into the refrigerator or even the freezer for a few minutes to firm up. This will make all the difference in achieving clean, precise cut-outs.

How To Prevent Your Sugar Cookies from Spreading in the Oven
Have you ever spent time meticulously cutting out beautifully intricate cookie shapes, only to have them morph into unrecognizable blobs after baking? This common baking frustration occurs when cookies spread too much in the oven, losing their distinct edges and designs. The ultimate secret to keeping your red velvet sugar cookies (or any cut-out cookies) from spreading is, once again, all about temperature: keeping the dough cold.
Here’s how to master the art of preventing cookie spread:
- The Cold Dough Principle: Cold dough contains butter that is firm, not melted. When cold dough hits a hot oven, the butter takes longer to melt, allowing the flour and other ingredients to set before the cookie can spread significantly. Warm dough, on the other hand, means the butter melts quickly, causing the cookies to flatten out rapidly.
- Freeze Before Baking: This is my highest recommendation for perfectly shaped cookies. Once you’ve cut out your red velvet cookies and placed them on your baking sheets, pop the entire baking sheet into the freezer for about 15-20 minutes while your oven preheats. This super-chilling step ensures the butter is incredibly firm, giving your cookies maximum protection against spreading.
- Use Cold Baking Sheets: Avoid placing new batches of cut-out dough onto warm baking sheets. A warm sheet will immediately start to melt the butter in your dough, encouraging spread. Always allow your baking sheets to cool completely between batches, or use multiple sheets.
- Measure Ingredients Precisely: An imbalance in ingredients, particularly too much butter or not enough flour, can also contribute to spreading. Always measure your flour by weight if possible, or use the spoon-and-level method if using measuring cups to ensure accuracy.
- Don’t Overmix the Dough: Overmixing develops gluten, which can lead to a tougher cookie. It also warms the dough, making it more prone to spreading. Mix just until ingredients are combined.
By following these tips, your red velvet sugar cookies will emerge from the oven with their beautiful shapes perfectly intact, ready for decorating!
Creative Ways To Decorate Red Velvet Sugar Cookies
Once your beautiful red velvet cookies have cooled, the fun truly begins: decorating! There are several wonderful ways to adorn these festive treats, ranging from simple to elaborately piped.
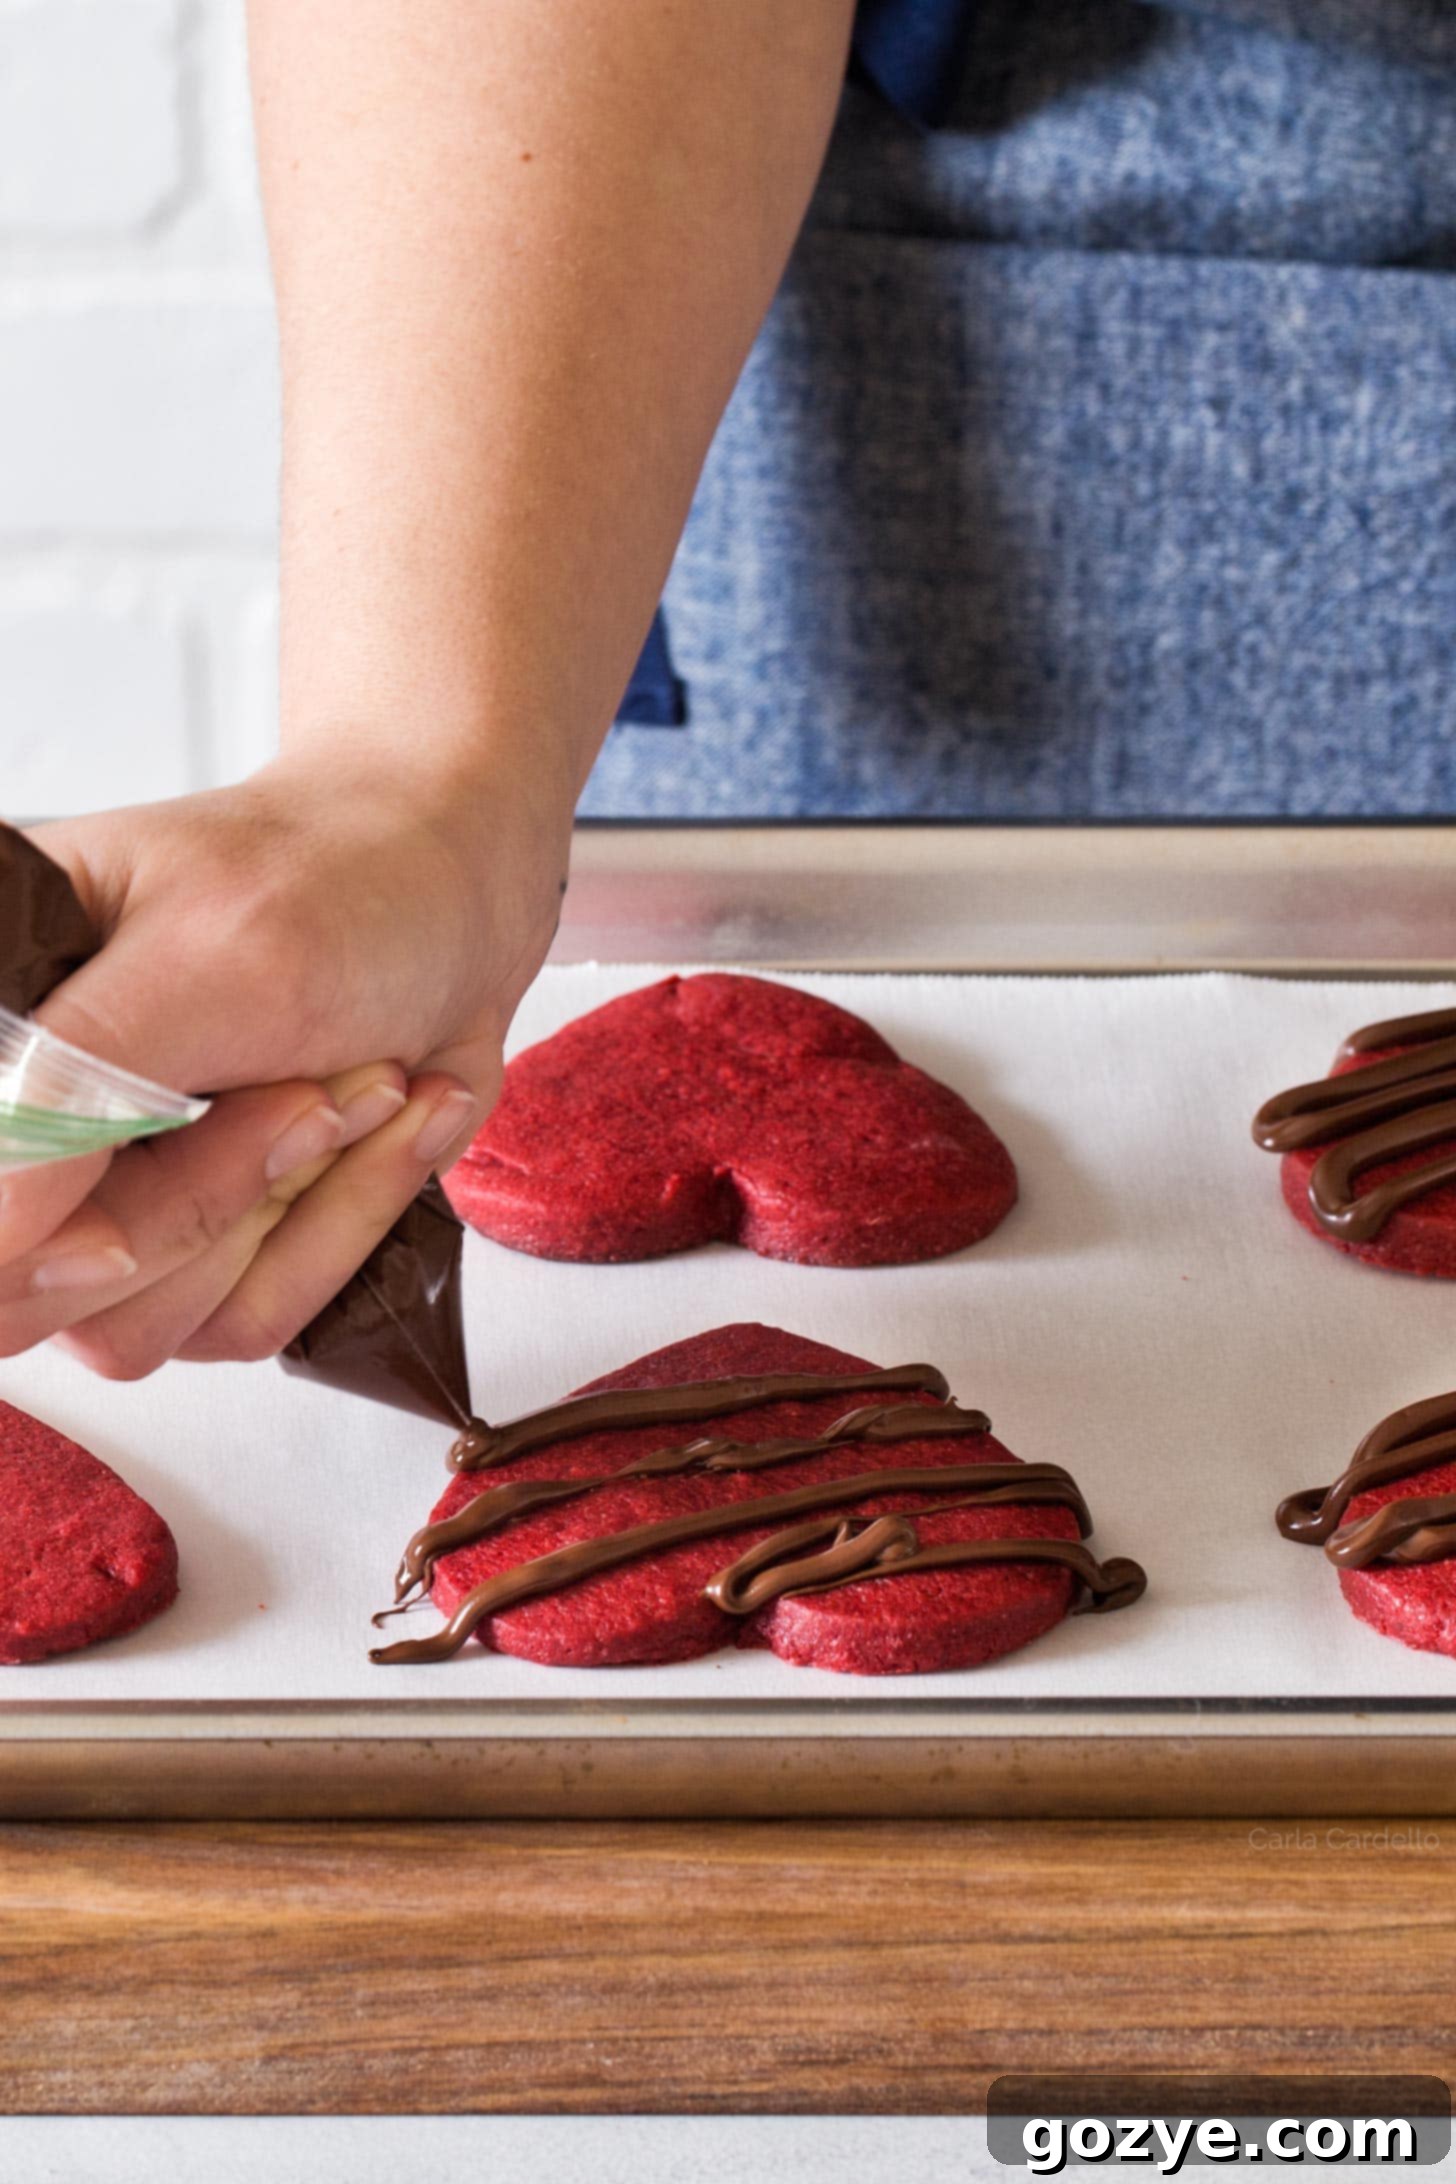
The simplest and quickest method is a luscious chocolate drizzle. Simply melt some semisweet chocolate chips or chopped chocolate in a microwave-safe bowl or over a double boiler. Once smooth, transfer the melted chocolate to a small sandwich bag, snip off a tiny corner of the bag, and drizzle artistic patterns over your cookies. The dark chocolate provides a beautiful contrast to the vibrant red of the cookies and adds an extra layer of flavor.
For a creamier finish, you can also frost these cookies with your favorite buttercream or cream cheese-based frostings. A small batch cream cheese frosting offers a classic pairing with red velvet, while a rich chocolate cream cheese frosting would enhance the subtle cocoa notes in the cookie itself. Just be mindful that cream cheese frostings don’t harden like royal icing, so you’ll need to store these cookies in a single layer.
However, for intricate designs and a clean, crisp finish, royal icing is the way to go. And if you’re like me and prefer to avoid raw eggs or special ingredients, my eggless royal icing recipe is your perfect solution.

Crafting Perfect Eggless Royal Icing for Your Cookies
Achieving beautifully decorated cookies with crisp lines and elegant details often calls for royal icing. Traditionally, royal icing relies on egg whites or meringue powder for its signature hardening quality. However, I understand that many bakers prefer to avoid raw egg whites, and buying a special ingredient like meringue powder for occasional use might not be ideal. That’s why I’m excited to share my go-to recipe for a fantastic eggless royal icing.
This small batch eggless royal icing uses a simple combination of powdered sugar, milk, and corn syrup. Each ingredient plays a crucial role:
- Powdered Sugar: Provides the bulk and sweetness of the icing, creating a smooth, fine texture.
- Milk: Used to achieve the desired consistency. You’ll add it slowly to get the right thickness.
- Corn Syrup: This secret ingredient adds a lovely subtle shine to the finished icing and also helps to make the icing a bit smoother and more pliable for piping. If corn syrup isn’t readily available or you’d rather not buy a whole bottle for a small amount, you can simply omit it. The icing will still work, though it may be slightly less shiny and smooth.
- Vanilla Extract: For flavor, complementing the red velvet cookie beneath.
Getting the Right Consistency
The most critical aspect of successful royal icing is its consistency. For piping details and outlines, the icing needs to be quite thick—thicker than you might initially think. In fact, you’ll likely be tempted to add more milk, but resist that urge! If the icing is too runny, it will spread out when piped, turning your precise dots and intricate squiggles into messy puddles. You want the icing to hold its shape when piped, like toothpaste coming out of a tube.
If you accidentally add too much liquid, don’t despair! You can easily correct it by adding about 1 tablespoon of powdered sugar at a time, mixing well after each addition, until the icing thickens back up to the desired consistency. Conversely, if your icing is too thick and difficult to pipe, add milk a mere 1/4 teaspoon at a time until it becomes more workable.
Once applied, this eggless royal icing will harden as it dries, creating a beautiful, protective shell. However, it is still a bit fragile. To prevent any damage to your intricate designs, avoid stacking the decorated cookies immediately after icing. Let them dry completely, ideally overnight, before carefully storing them in a single layer in an airtight container.

Red Velvet Sugar Cookies FAQ
The vibrant red color of red velvet can sometimes fade slightly during the baking process. To counteract this, always aim for your dough to be a brighter, more intense shade of red than your desired final color. If using liquid food coloring, don’t be afraid to add a little extra until you achieve a deep, rich red before chilling and baking. Gel or paste food coloring can also yield a more intense color with less volume.
Absolutely! Freezing is a great way to prepare ahead. You have a few options: you can freeze the raw dough (either as a disk wrapped tightly in plastic wrap, or already cut into shapes and layered with parchment paper in an airtight container), or you can freeze the undecorated baked cookies. Thaw dough in the refrigerator overnight before rolling/baking. Thaw baked cookies at room temperature before decorating.
Yes, this recipe can be easily doubled if you need a larger batch of cookies for a party or holiday gathering. Just ensure you have a large enough mixing bowl to accommodate the increased volume of dough. You’ll also likely need 2-3 cookie sheets, depending on the size of your cookies, to bake all batches efficiently.
Red velvet cookies don’t turn golden brown like traditional sugar cookies. Look for edges that appear firm and slightly set. The centers should no longer look wet or shiny, but still be a little soft to the touch. It’s better to underbake slightly for a more tender cookie.
While corn syrup helps with shine and smoothness, it’s not absolutely essential. You can omit it, and your eggless royal icing will still work perfectly well. Just be sure to adjust the milk content to achieve the desired thick, pipeable consistency.
Absolutely! These red velvet sugar cookies are incredibly versatile. Use heart shapes for Valentine’s Day, Christmas trees or snowflakes for winter holidays, or any fun shapes for birthdays or everyday treats. Their vibrant red color makes them a standout for any festive occasion.

More Delicious Cut Out Cookie Recipes to Explore
If you’ve enjoyed baking and decorating these delightful red velvet cut-out cookies, you’ll love exploring more of our fun and festive cookie recipes. Perfect for any season or celebration, these recipes are designed for easy cutting and creative decorating:
- Small Batch Gingerbread Cookies: Classic spiced cookies, perfect for the holidays, complete with an eggless royal icing option.
- Chocolate Chip Cut Out Cookies: A creative twist on a beloved classic, allowing you to cut out your favorite shapes with the irresistible taste of chocolate chip cookies.

Red Velvet Sugar Cookies
1 dozen
50 minutes
10 minutes
1 hour
2 hours
Elevate your baking with homemade Red Velvet Sugar Cookies! This recipe transforms traditional sugar cookies into vibrant, festive cut-outs perfect for Valentine’s Day, Christmas, or any celebration. Easy to decorate with a simple chocolate drizzle or our signature eggless royal icing, these tender cookies are a delightful treat.
Ingredients
- 1 + 2/3 cups all-purpose flour
- 2 tablespoons unsweetened cocoa powder
- 1/2 teaspoon baking powder
- 1/4 teaspoon table salt
- 3/4 cup granulated sugar
- 1/2 cup (4 ounces or 8 tablespoons) unsalted butter, room temperature
- 1 large egg, room temperature
- 1 teaspoon vanilla extract
- 1 tablespoon red food coloring
- Melted chocolate, for drizzling (optional if not using royal icing)
Royal Icing
- 1 cup powdered sugar, sifted
- 2 teaspoons milk
- 2 teaspoons corn syrup
- 1/4 teaspoon vanilla extract
- Sprinkles
Instructions
- In a medium bowl, thoroughly whisk together the all-purpose flour, unsweetened cocoa powder, baking powder, and salt. Set aside.
- In a large mixing bowl, using a stand mixer with the paddle attachment or a hand mixer, beat together the granulated sugar and softened unsalted butter on medium-high speed until the mixture is light, fluffy, and creamy, typically 1-2 minutes.
- Scrape down the sides of the bowl. Add the room temperature egg, vanilla extract, and red food coloring. Beat on low speed until all ingredients are fully incorporated and the dough has a uniform, vibrant red color.
- Gradually add the whisked dry flour mixture to the wet ingredients, beating on low speed until a cohesive dough forms. Mix just until the flour streaks disappear, being careful not to overmix.
- Divide the dough into two equal pieces. Place each piece between two sheets of plastic wrap and roll it out immediately to an even 1/4-inch thickness. Refrigerate the flattened dough for at least 1 hour, or until firm. This pre-rolling helps prevent sticking later.
- Preheat your oven to 350°F (175°C). Prepare 1 large or 2 small baking sheets by lining them with parchment paper for easy release and cleanup.
- Working with one piece of chilled dough at a time, place it on a lightly floured surface or between two sheets of parchment paper. Use floured cookie cutters to cut out your desired shapes. Carefully gather any dough scraps, gently re-roll them, and cut out additional shapes until all the dough is used. If the dough becomes too warm and sticky, return it to the refrigerator to chill further.
- Transfer the cut-out cookies to the prepared baking sheets. For best results in preventing spread, place the baking sheets with cookies in the freezer for 15-20 minutes while the oven finishes preheating. Bake for 8-10 minutes, or until the edges are firm and the centers are set. Baking time will vary with cookie size.
- Cool the baked cookies on the baking sheet for 5 minutes before carefully transferring them to a wire rack to cool completely. Once fully cooled, decorate as desired with chocolate drizzle, royal icing, or your favorite cream cheese frosting.
Store decorated cookies in a single layer in an airtight container at room temperature for up to 1 week.
For the Royal Icing:
- In a medium mixing bowl, combine the sifted powdered sugar, milk, corn syrup (if using), and vanilla extract. Beat together with a whisk or electric mixer until smooth and lump-free. The icing should be quite thick, holding its shape when stirred. If it’s too runny, add powdered sugar 1 tablespoon at a time until thickened. If it’s too stiff, add milk 1/4 teaspoon at a time until it reaches a pipeable consistency.
Notes
- For alternative decorating options, you can also frost these cookies with a small batch cream cheese frosting or a rich chocolate cream cheese frosting. Remember that these frostings do not harden like royal icing, so stack carefully once set.
- If you enjoyed this recipe and love cut-out cookies, be sure to check out our other popular recipes: Chocolate Chip Cut Out Cookies and Small Batch Gingerbread Cookies.
- To ensure your cookies are a vibrant red, don’t be shy with the food coloring in the dough. The color often mutes slightly during baking.
Did you make this recipe?
Let me know what you think! Rate the recipe above, leave a comment below, and/or share a photo on Instagram using #HITKrecipes
First published February 10, 2012
