Crafting Delightful Cookie Cutter Fudge: The Ultimate Homemade Gift Guide for Any Occasion
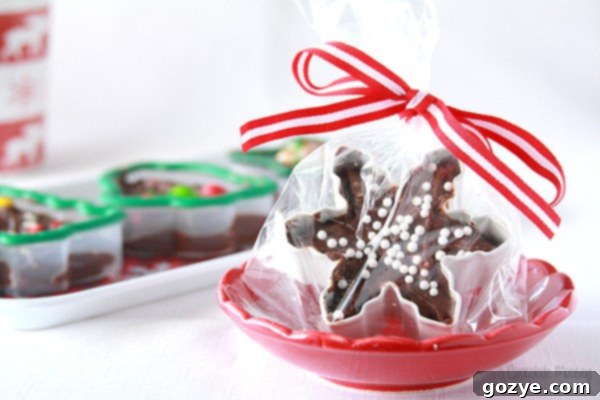
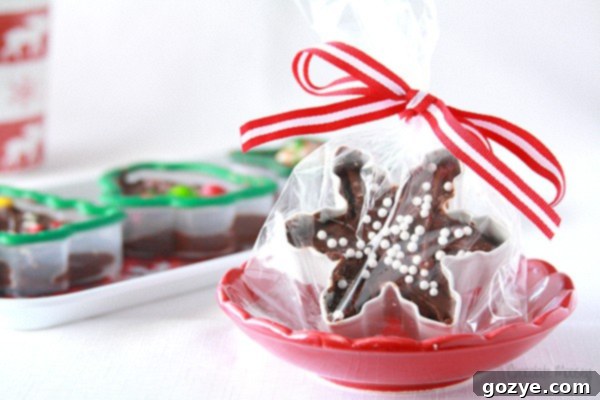
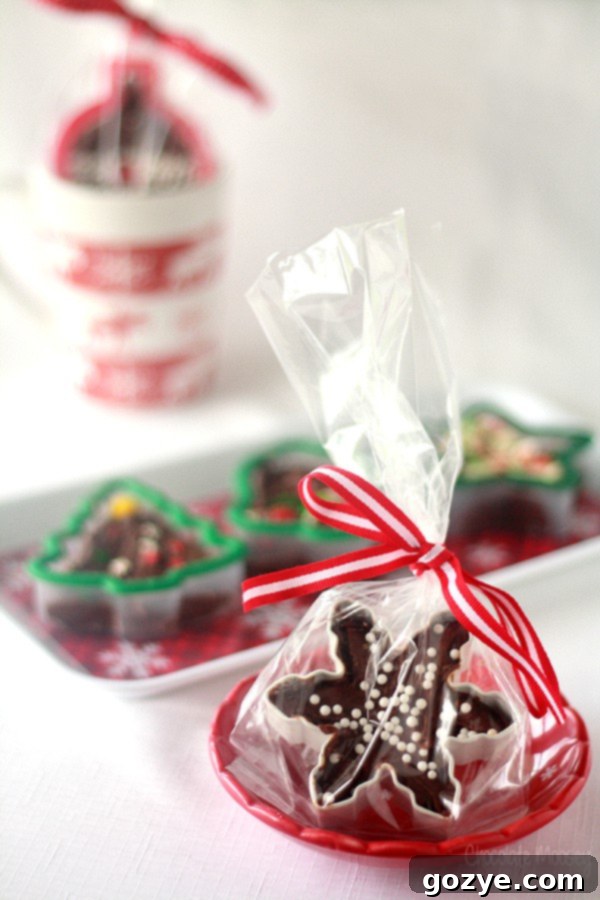
Are you searching for a truly special, personal, and utterly delicious gift that goes beyond a simple store-bought item? Look no further! This season, or for any upcoming celebration, surprise your loved ones with charming Cookie Cutter Fudge. It’s not just a treat; it’s an experience, a memory, and a practical gift all rolled into one. Imagine the joy of receiving homemade fudge in a festive shape, accompanied by the very cookie cutter used to make it – a delightful keepsake for future baking adventures!
With holidays like Christmas fast approaching, or perhaps a birthday or special event on your calendar, the quest for the perfect present can often feel overwhelming. While gift cards offer convenience, they sometimes lack the personal touch that truly conveys care and affection. That’s where “Gifts From The Kitchen” shine, and this Cookie Cutter Fudge recipe is a prime example. It’s a gift made from the heart, a labor of love that is both thoughtful and remarkably budget-friendly. Plus, who could possibly resist a delectable piece of creamy, homemade fudge?
Why Cookie Cutter Fudge is the Perfect Personalized Gift
In a world saturated with mass-produced goods, a homemade gift always stands out. Cookie Cutter Fudge offers several compelling advantages that make it an exceptional choice for friends, family, coworkers, and neighbors alike:
- A Truly Personalized Touch: The real magic of this gift lies in its customizability. You can select cookie cutters that perfectly reflect the recipient’s hobbies, favorite animals, or the theme of the holiday. From classic stars, trees, or gingerbread men for Christmas to charming hearts for Valentine’s Day, or even custom shapes for birthdays and baby showers, the possibilities for personalization are truly endless.
- A Dual Gift Experience: Each lucky recipient receives not only a scrumptious, melt-in-your-mouth piece of homemade fudge but also a reusable cookie cutter. It’s a gift that keeps on giving, encouraging them to create their own festive treats in the future, long after the last bite of fudge has been enjoyed.
- Incredibly Budget-Friendly: Making fudge from scratch is often significantly more economical than purchasing multiple individual gifts, especially when you’re gifting to a large group of people. Cookie cutters themselves are very affordable and can often be purchased in convenient multipacks from dollar stores, craft shops, or online retailers, further reducing costs.
- Universally Loved and Versatile: Fudge is a timeless and universally adored confection. This particular recipe allows for various flavor combinations and toppings (as suggested in the notes), ensuring there’s a perfect fudge creation to tantalize every palate and suit any dietary preference or craving.
- Memorable and Heartfelt: A homemade gift carries a unique charm, warmth, and story that a generic store-bought item simply cannot. It clearly demonstrates effort, time, and thoughtful consideration, leaving a lasting and cherished impression on the recipient.
Getting Started: Essential Tips for Perfect Cookie Cutter Fudge Every Time
This recipe is designed to be straightforward and forgiving, making it perfect for both seasoned bakers and complete beginners in the kitchen. However, a few key tips and tricks will ensure your fudge turns out perfectly smooth, delicious, and beautifully shaped every single time:
Selecting and Preparing Your Cookie Cutters with Care
Cookie cutters are available in an astonishing array of shapes and sizes. For this particular recipe, you’ll want to use sturdy metal cookie cutters, ideally around 3 inches in diameter, as they are best suited to hold the warm fudge mixture effectively. As the original author noted, dollar stores are often fantastic places to find a wide variety of shapes!
Once you have your chosen cutters, the most crucial step for success is proper preparation:
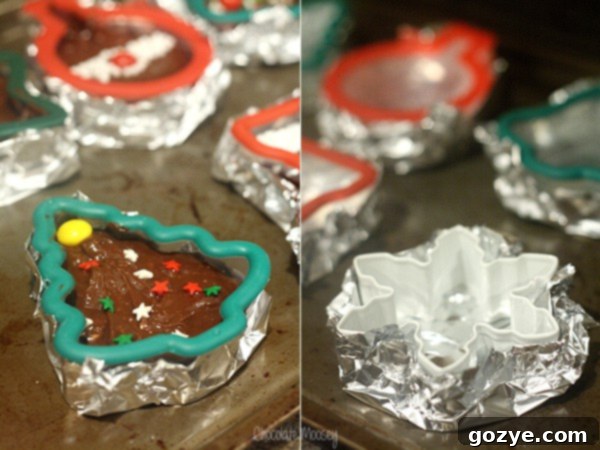
- Foil Wrapping is Your Best Friend: This step cannot be emphasized enough! Tightly wrap the bottom and sides of each cookie cutter with heavy-duty aluminum foil. This creates a secure, leak-proof seal that is essential to prevent the warm fudge from seeping out before it has a chance to set. Ensure the foil extends up the sides of the cutter to form a sturdy wall.
- Strategic Cookie Sheet Placement: Once your cutters are meticulously foil-wrapped, arrange them neatly on a large baking sheet or a sturdy flat pan. This provides a stable surface for filling them and makes it incredibly easy to transport the cutters to the refrigerator for chilling without any spills or mishaps.
If your intention is not to gift the actual cookie cutters, you can still absolutely use this method! Just be sure that the fudge is thoroughly chilled and completely firm before you attempt to remove it from the cutters. Trying to unmold soft or room-temperature fudge, as the original text wisely points out, will almost certainly lead to a “big, messy failure” and a lot of frustration. An excellent alternative is to make a large batch of fudge in an 8×8-inch pan, allow it to set completely, and then use your cookie cutters to cut out shapes from the firm slab, creating equally charming pieces without gifting the cutters.
Unleashing Your Inner Artist: Creative Decorating Ideas for Your Fudge
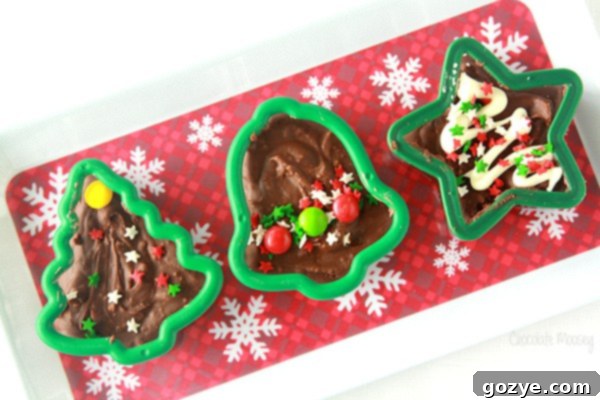
Decorating is where your Cookie Cutter Fudge truly comes alive and allows you to infuse your personal style and creativity into each piece! While the thought of decorating might feel daunting to some, it’s surprisingly easy to achieve beautiful and impressive results. The key is to add your chosen decorations while the fudge is still wet and warm, immediately after pouring it into the cutters, ensuring they adhere perfectly as the fudge cools and sets.
- Classic Sprinkles Galore: A simple yet incredibly effective choice! Utilize colorful sprinkles, nonpareils, jimmies, or sanding sugars to add fantastic texture and vibrant visual appeal. For the holidays, look for special festive mixes that feature appropriate shapes and colors, like red and green for Christmas, or pastel for Easter.
- Mini Candies for Fun: Small candies like mini M&Ms, finely chopped Skittles (as the original author suggests for a burst of color and fruitiness), or even tiny chocolate chips can add a delightful crunch and an extra layer of flavor. Arrange them artfully or scatter them for a playful look.
- Elegant Melted Chocolate Drizzles: For a more sophisticated or intricate touch, melt white chocolate, dark chocolate, or brightly colored candy melts. Use a piping bag with a fine tip to drizzle them artistically over the set fudge in decorative patterns, or simply use a spoon for a more rustic and free-form look.
- Royal Icing or Buttercream for Detail: For those with a bit more artistic flair or experience in piping, a thin layer of royal icing or piped buttercream can create incredibly intricate designs, messages, or borders. Just ensure your fudge is completely firm and chilled before you attempt to apply any icing to prevent smudging.
- Gourmet Nuts or Dried Fruit: For a more refined and gourmet feel, consider topping your fudge with finely chopped nuts (such as pecans, walnuts, or almonds) or small, colorful pieces of dried fruit like cranberries, cherries, or apricots. These additions provide both texture and sophisticated flavor notes.
Beyond Christmas: Customizable Fudge for Every Celebration Imaginable
While the initial thought might be to craft these delightful treats exclusively for Christmas, the true brilliance of Cookie Cutter Fudge lies in its incredible, year-round versatility. Do not limit this fantastic idea to just one holiday season! With the vast and ever-growing array of cookie cutters available today, you can truly customize your homemade fudge for virtually any special occasion that graces your calendar:
- Valentine’s Day: Utilize classic heart-shaped cutters, adorn with romantic red and pink sprinkles, or drizzle with delicate white chocolate for the perfect expression of affection.
- Birthday Celebrations: Employ number-shaped cutters (to represent the age), fun cake cutters (the author’s wish for a big cupcake cutter is a brilliant idea!), or whimsical shapes like balloons, stars, or even party hats. Decorate with bright, celebratory colors to match the birthday theme.
- Easter Festivities: Transform your fudge into adorable bunnies, intricate eggs, or cheerful chick shapes. Adorn them with soft pastel sprinkles or melted pastel-colored candy melts for a springtime delight.
- Spooky Halloween Treats: Opt for eerie ghost, grinning pumpkin, or flying bat cutters. Decorate with vibrant orange, mysterious black, and playful purple toppings for a deliciously spooky surprise.
- Charming Baby Showers: Celebrate new arrivals with baby bottle, onesie, or rattle-shaped cutters. Decorate with gentle blue or pink sprinkles, or a delicate drizzle of corresponding colored chocolate.
- Graduation Milestones: Use cap and gown cutters, or even symbolic diploma scrolls, decorating them with the graduate’s school colors for a truly memorable and impressive achievement gift.
- Teacher Appreciation Gifts: Thoughtful apple or pencil-shaped cutters make for a perfect end-of-year or thank-you gift for educators.
- Simple “Thank You” Tokens: For a more understated yet elegant gesture, use simple shapes like circles or squares, perhaps with a “Thank You” message delicately piped on top.
The remarkable ability to adapt this recipe makes it an enduring year-round favorite for thoughtful, personalized gift-giving. A quick trip to a local craft store, baking supply shop, or even a browse through online retailers will reveal an astonishing selection of cookie cutters, guaranteeing that you’ll find the perfect shape for absolutely any event on your calendar, ensuring your homemade fudge always makes a statement.
Foolproof Fudge: Embracing the No-Thermometer Method for Easy Success
One of the most appealing features of this particular recipe is its incredible simplicity. You absolutely do not need a candy thermometer, specialized equipment, or any advanced confectionery skills to achieve perfectly smooth, rich, and delectable fudge. This “melt and pour” method ensures consistent success every single time, even for novice cooks. Here’s a brief, step-by-step overview of the straightforward process, with more detailed instructions provided in the recipe card below:
- Gentle Melting Process: The recipe ingeniously calls for a double boiler method. This involves placing a heat-proof bowl over a saucepan of gently simmering water, ensuring the bowl’s bottom does not touch the water. This indirect heat is crucial for gently melting the chocolate, peanut butter, and butter, preventing any scorching and ensuring a beautifully smooth, creamy base for your fudge.
- Whisking to Silky Perfection: Once the ingredients have melted into a smooth liquid, carefully remove the bowl from the heat. Immediately whisk in the sifted powdered sugar and vanilla extract until they are fully incorporated and completely blended. The powdered sugar is the key ingredient here, imparting the fudge with its characteristic smooth texture without the need for complex crystallization techniques or precise temperature monitoring.
- Filling and Personalizing: With your warm fudge mixture ready, use a spoon or a heat-proof vessel with a pouring spout to carefully fill each of your prepared cookie cutters. This is the exciting part! Then, it’s time to unleash your creativity and decorate the tops of the fudge with your chosen candies, sprinkles, or other toppings.
- Crucial Chilling Phase: Allow the fudge to cool completely and firm up. This chilling phase is absolutely essential for achieving a clean, neat unmolding and the perfect, sliceable texture. Resist the temptation to rush this step!
This wonderfully straightforward approach means less stress and significantly more enjoyment in the kitchen, allowing you to truly focus on the delightful parts like decorating, packaging, and ultimately, savoring your homemade creations.
Cookie Cutter Fudge
6 servings
5 minutes
15 minutes
20 minutes
This easy recipe for Cookie Cutter Fudge creates adorable and delicious treats, perfect for personalized gifts during Christmas or any holiday. Fill them with your favorite fudge flavor for a truly special touch!
Ingredients
- Six (3-inch) sturdy metal cookie cutters
- 1 cup (approx. 6 oz) semisweet chocolate chips
- 1 cup creamy peanut butter (smooth, not crunchy)
- 1/2 cup (4 ounces) unsalted butter, cut into 8 tablespoons
- 1 cup powdered sugar, sifted (to prevent lumps and ensure a smooth texture)
- 1 teaspoon pure vanilla extract
- Assorted candy and sprinkles, for decorating (e.g., mini M&Ms, chopped Skittles, festive sprinkles, nonpareils)
Instructions
- Prepare Cookie Cutters: Tightly wrap the bottom of each cookie cutter with aluminum foil, extending the foil up the sides to create a secure, leak-proof base. Place the prepared cutters onto a large cookie sheet or baking pan. Set aside.
- Melt Ingredients Gently: Bring about an inch of water to a steady simmer in a medium saucepan. Place a heat-proof bowl (such as a glass or stainless steel bowl) on top of the saucepan, ensuring the bottom of the bowl does not touch the simmering water. Add the semisweet chocolate chips to the bowl and stir gently with a spatula or spoon until they are almost completely melted and smooth.
- Combine and Smooth: Add the creamy peanut butter to the melting chocolate, stirring continuously until the mixture is almost smooth and well combined. Next, add the cut-up unsalted butter and continue to stir until all the ingredients are completely melted and the mixture is silky smooth and uniformly combined.
- Whisk in Flavor & Sweetness: Turn off the heat and carefully remove the bowl from the saucepan. Immediately whisk in the sifted powdered sugar and pure vanilla extract until they are fully incorporated into the mixture and the fudge is thick and well blended. Ensure there are no lumps remaining from the powdered sugar for a perfectly smooth consistency.
- Fill & Decorate Promptly: Using a spoon or a heat-proof vessel with a pouring spout, carefully spoon or pour the warm fudge mixture into each of the prepared cookie cutters, filling them evenly. If you have any leftover fudge mixture, you can pour it into a small ramekin or a lined mini loaf pan to enjoy later. Promptly decorate the tops of the fudge with your chosen candy and sprinkles before it begins to cool and set.
- Chill Until Firm: Carefully transfer the cookie sheet with the filled cutters into the refrigerator. Allow the fudge to cool and firm up completely, which typically takes at least 1-2 hours, or until it is solid to the touch. Once thoroughly firm, gently peel away the aluminum foil from each cutter and carefully push the fudge out. Store the finished Cookie Cutter Fudge in an airtight container at room temperature for up to a week, or in the refrigerator for extended freshness.
Notes for Customization
You are absolutely welcome to customize this recipe by using any fudge flavor or variation you like! For instance, you could substitute white chocolate chips and add a different extract like almond, peppermint, or even a hint of orange zest for a unique taste. You could also swirl in fruit preserves, chopped dried fruits, or different types of nuts. The key to success is maintaining the core consistency of the “melt and pour” base ingredients for the best, most reliable results.
Did you make this delightful Cookie Cutter Fudge?
We’d absolutely love to hear about your wonderful creations! Please take a moment to rate the recipe above, share your experience in the comments section below, and/or post a beautiful photo of your fudge on Instagram using the hashtag #HITKrecipes. Your feedback and festive fudge photos inspire us all to get creative in the kitchen!
Source: Adapted from Peanut Butter Planet (Amazon affiliate link)
More Irresistible Fudge Recipes for Your Collection
If you’ve fallen in love with making homemade fudge, or if you’re simply looking for more delightful variations to expand your gifting repertoire, explore these other fantastic fudge recipes from the archive. Each one offers a unique flavor profile and the same homemade goodness that your loved ones and your taste buds will adore. Happy baking and gifting!
Easy Chocolate Peanut Butter Fudge
Creamy Lemon Fudge
Easy Nutella Fudge
Oreo Fudge
Easy Peanut Butter Oreo Fudge
Whether you’re crafting edible gifts for the bustling holiday season, celebrating a cherished special event, or simply want to treat yourself to a delightful homemade confection, this Cookie Cutter Fudge recipe is sure to become a cherished favorite in your recipe collection. Its ease of preparation, remarkable adaptability, and undeniable charm make it a standout choice for any occasion. Happy making, and savor the joy and smiles your delicious efforts will undoubtedly bring!
