S’mores Baked Alaska For Two: A Mini Dessert Delight with Chocolate Ice Cream and Marshmallow Meringue
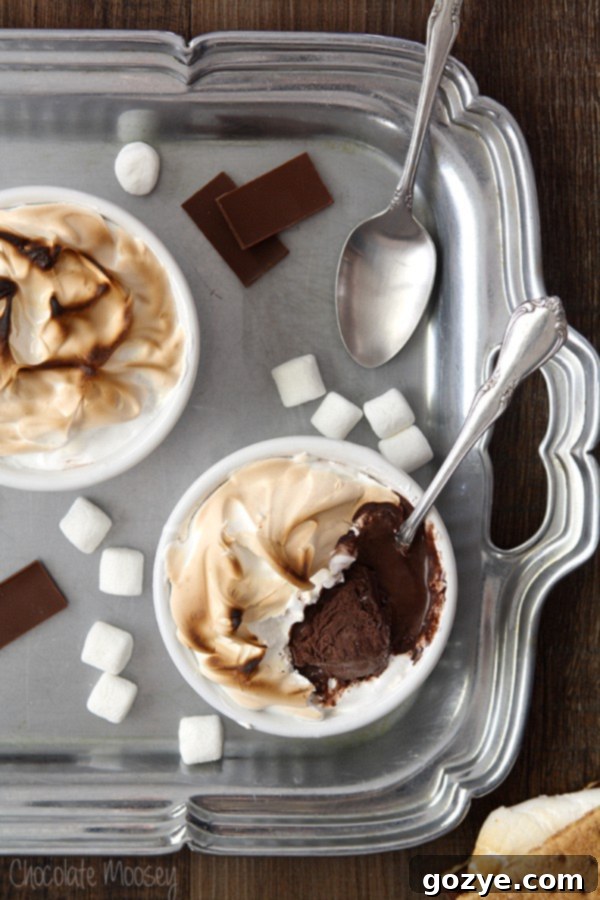
Imagine the perfect blend of textures and temperatures: the warm, toasted crispness of marshmallow meringue giving way to a core of still-cold, rich chocolate ice cream, all nestled on a buttery graham cracker crust. This is the magic of our Mini S’mores Baked Alaska for Two, a decadent treat that offers a delightful contrast in every bite. It’s a dessert that perfectly embodies both indulgence and a touch of whimsy, ideal for sharing with someone special or savoring all by yourself.

Now that I’m mostly settled into my new apartment, I think it’s time to fill you in on more than just dessert. While this S’mores Baked Alaska For Two might seem like a simple sweet escape, it actually holds a deeper connection to a significant personal transition. If you’ve been following my journey on social media, you might have noticed a subtle shift – I’ve moved back to Pittsburgh, the city where I grew up, a move I even briefly mentioned in a previous post.
I strategically scheduled a few posts during my move to ensure my absence wasn’t too noticeable, but I bet now you’re curious about the details. How did this major life change come about, and what does it have to do with these adorable, miniature S’mores Baked Alaskas? Well, I actually made this recipe a few weeks before my move, using up some chocolate ice cream and egg whites I had on hand. The idea had been simmering ever since I crafted a s’mores pie for my birthday, and I knew I wanted to revisit those iconic flavors in a new, exciting way. The result? A perfectly scaled-down version featuring a buttery graham cracker crust, luscious chocolate ice cream, and fluffy marshmallow meringue, all baked to perfection in two small ramekins.
Whether you choose to share these delightful mini baked Alaskas with a loved one or keep both for a double dose of personal indulgence, that delicious decision is entirely up to you. But first, let me share a bit more about the journey that led me to this new beginning.

The bottom half was my apartment
A New Chapter: Settling Back in Pittsburgh
Reflecting on Four Years in a Small Town
For the past four years, my life was anchored in a small country town, where I worked as an in-house videographer for a machine manufacturing company. My primary role was to produce critical training videos, ensuring that employees could operate our complex machinery safely and effectively. It was my very first “big girl job,” and at the time, I truly believed this was the path I wanted to take – a career dedicated to video production. After spending 13 months job hunting following my time at Target, I was simply thrilled to be producing videos, regardless of the industry.
The Challenges of a Solo Videographer Role
However, somewhere along the line, I found myself feeling increasingly lost. While being the sole videographer might sound exciting – the freedom to tackle every aspect of production – the reality was often isolating and challenging. I had little to no guidance and, frankly, very little experience to draw upon. I never truly appreciated how crucial a team, or even just one other videographer, could be for bouncing ideas, sharing insights, and offering support. It wasn’t necessarily the workload that was overwhelming; I had no problem putting in the effort. What I truly craved was someone who understood my specific frustrations, someone who “got” me. Being the only trained videographer in the entire company meant there was no one to turn to for technical advice, creative feedback, or even just to vent about the unique challenges of the role. There were days I questioned my purpose and felt like a complete failure. Moments when my own department wouldn’t utilize my photography skills, despite my persistent efforts to highlight them, left me feeling unheard and undervalued. Lacking previous corporate experience, I had no benchmark to compare my situation to. Was this typical for all jobs? Was this just “how the corporate world works”?
Making the Leap: Why I Moved Back Home
Eventually, I reached my breaking point. I made a solemn promise to myself: if I didn’t find another job by my next work anniversary, which was July 12th, I had to take action. Anything to change my circumstances. In truth, I had been planning my move back to Pittsburgh for at least a year. I even had two job interviews in the city, but unfortunately, my non-local status made it significantly harder to convince prospective employers to take a chance on me. Weighing my options, I decided to take a leap of faith, relying on my savings and the income generated from blogging. I packed up my life and moved, choosing to “figure it out as I go.” While I generally wouldn’t recommend such a bold approach, the past year’s experiences pushed me to make that decisive move.
Despite the challenges, I don’t regret these past four years, not at all. They were a profound period of self-discovery, teaching me who I was and, more importantly, who I was meant to become. I remember a powerful quote from the latest X-Men movie that resonated deeply with me, almost bringing me to tears in the theater: “Just because someone stumbles and loses their way, it doesn’t mean they’re lost forever.” This sentiment perfectly captured my feelings and gave me hope for the future. Will I return to videography? I’m genuinely not sure. I’m hoping to produce a few cooking videos soon, to see if I can rekindle that creative fire. Hopefully, it’s not gone forever.

S’mores Baked Alaska For Two: The Perfect Indulgence
Now, let’s finally dive into the delicious details of my S’mores Baked Alaska For Two. I vividly recall my first encounter with Baked Alaska in my high school cooking class. Our teacher introduced it as a dessert named to honor Alaska’s addition to the U.S. Traditionally, it consists of a sponge cake base topped with ice cream, all encased in a fluffy meringue that is then briefly toasted to a golden perfection.
The Magic of Contrasting Textures: Toasted Meringue, Cold Ice Cream, and Crispy Crust
There’s something truly magical about the experience of eating contrasting temperatures and textures in a single bite. One spoonful delivers the satisfying crunch of toasted, crispy meringue, immediately followed by the refreshing chill of still-cold ice cream, and finally, the delightful crumble of the graham cracker crust. This dessert isn’t just a treat for the taste buds; it’s an adventure in culinary sensation. The beauty of Baked Alaska lies in the science behind it: if executed correctly, the meringue acts as an excellent insulator, protecting the ice cream from melting even under the intense heat of a torch or broiler. However, one tiny little hole or crack in the meringue, and the heat finds its way in, quickly turning your frozen delight into a melted mess. Fortunately, making these in individual ramekins makes any minor imperfections less crucial, as the smaller size helps contain the ice cream more effectively.

Make-Ahead Tips and Freezing Baked Alaska
Here’s a fun fact about these S’mores Baked Alaska: they actually freeze remarkably well even after the meringue has been toasted! I was initially concerned that the marshmallow meringue would become too hard or brittle when frozen, but to my pleasant surprise, it maintained a wonderful softness. While you might lose some of the dramatic hot-and-cold temperature contrast, the cold, soft meringue combined with frozen chocolate ice cream is still absolutely delicious and satisfying. This makes them a fantastic make-ahead dessert for entertaining or simply having a special treat ready whenever the craving strikes.
Mastering the Meringue: Tips for Flawless Peaks
Now for a not-so-fun fact: meringue can be quite finicky. I’ve had my share of meringue mishaps, sometimes needing to whip the egg whites three times before finally achieving those perfect, stiff peaks. To save you some frustration, here are my top tips for meringue success:
- Ensure Cleanliness: This is paramount! Your mixing bowls and beaters must be squeaky clean and completely dry. Even the slightest trace of fat (from oil, butter, or even a tiny drop of egg yolk) or water will prevent the egg whites from whipping properly.
- Avoid Plastic Bowls: Plastic bowls tend to retain traces of fat, no matter how rigorously you wash them. Stick to glass or metal bowls for meringue.
- Watch the Weather: Humidity is meringue’s arch-nemesis. Avoid making meringue on a rainy or very humid day, as the excess moisture in the air can significantly impact the egg whites’ ability to hold their shape and volume.
- Separate Carefully: When separating eggs, be extremely diligent. If even a tiny speck of egg yolk finds its way into the whites, you’ll need to start over with fresh eggs.
Once you master these tricks, whipping up a gorgeous, glossy meringue will become second nature! For more meringue experience and practice, be sure to check out my delightful mini lemon meringue pies.
Embracing the Unknown: Freelance Life and Future Hopes
As for life in Pittsburgh, I’m still very much in the process of adjusting to my new routine and surroundings. The most challenging aspect is undoubtedly the uncertainty of what the next few months will bring. For now, I’m proudly embracing my role as a freelance food photographer and recipe writer – because, let’s be honest, telling people you’re a food blogger for a living often elicits some pretty confused looks!
There are days when I desperately wish I had a crystal ball to guide me, to show me the clear path forward. But I don’t. All I have is hope, a belief that everything will ultimately unfold exactly the way it’s meant to be. And perhaps, a delicious Mini S’mores Baked Alaska to sweeten the journey.

S’mores Baked Alaska For Two
2 servings
S’mores Baked Alaska For Two is a mini decadent dessert that pairs the contrast of toasted, crispy marshmallow meringue with still-cold chocolate ice cream and graham cracker crust, perfect for a special treat.
Ingredients
- 1/4 cup graham cracker crumbs
- 1 tablespoon melted butter
- 1 cup chocolate ice cream, softened slightly
- 2 egg whites
- 1/8 teaspoon cream of tartar
- 1/2 cup granulated sugar
- 1/2 teaspoon vanilla extract
Instructions
- Preheat oven to 350F (175C). Have two small ramekins ready.
- In a medium bowl, mix together the graham cracker crumbs and melted butter until moistened and small clumps form. Press this mixture firmly into the bottom of each ramekin to create a crust. Bake for 5-7 minutes, or until the crust is set and lightly golden. Remove from oven and let cool completely.
- Prepare the meringue: In a heatproof bowl set over a pan of simmering water (ensure the bowl does not touch the water), combine the egg whites, cream of tartar, and granulated sugar. Whisk constantly for about 3-4 minutes, until the sugar is completely dissolved and the mixture appears pale and opaque. This process gently cooks the egg whites, making the meringue more stable.
- Immediately transfer the warm egg white mixture to a large, impeccably clean mixing bowl. If using a stand mixer, attach the whisk. Add the vanilla extract. Begin beating the egg whites on low speed, gradually increasing the speed to high. Continue beating for roughly 5-7 minutes, or until the meringue is glossy, forms stiff peaks (when you lift the beater, the peaks will stand firm without falling over), and has cooled down.
- Assemble the Baked Alaska: Fill each cooled ramekin (with its crust) generously with the slightly softened chocolate ice cream. Then, spoon or pipe the meringue topping over the ice cream, ensuring that the entire surface of the ice cream is completely covered and there are no exposed areas or holes. This is crucial for insulation.
- Toasting the meringue: Toast the meringue topping using a kitchen blowtorch until beautifully golden brown. Alternatively, you can carefully place the ramekins under a broiler for a very short time (watch constantly, as it toasts quickly) until the meringue is lightly browned. Serve immediately to enjoy the incredible contrast of temperatures.
Notes
Whipping egg whites for meringue is an art that requires attention to detail. Always ensure all bowls and beaters used are impeccably clean and completely dry. Avoid using plastic bowls, as they can retain fatty residues even after washing. Additionally, high humidity or rainy days can make it challenging to achieve stiff peaks, so choose a dry day if possible. If any egg yolk accidentally mixes with the egg whites during separation, it’s best to start over, as fat will prevent the whites from whipping properly.
Did you make this recipe?
Let me know what you think! Rate the recipe above, leave a comment below, and/or share a photo on Instagram using #HITKrecipes
Source: Meringue technique adapted from The Back in the Day Bakery Cookbook (Amazon affiliate link)
Want More S’mores Inspired Recipes?
Single Serving S’mores Peanut Butter Cup Brownie
S’mores Ice Cream
S’mores Chocolate Chip Cookie Cups
S’mores Cookie Crumb Bars
S’mores Blossom Cookies
(Really Thick) S’mores Rice Crispy Treat Bark
