Unlock the Secret to Perfect Baked Alaskaette Cupcakes: A Marshmallow Masterpiece

Every now and then, a baking challenge comes along that truly sparks the imagination, pushing you to explore new frontiers in the kitchen. For me, that moment arrived with the “Cupcake Hero” challenge, specifically the tantalizing theme of marshmallows. While many bakers might immediately gravitate towards classic combinations like rocky road or peanut butter marshmallow, I was determined to craft something truly unique—a dessert that would stand out and surprise with every bite. My quest led me to the ingenious concept of “Baked Alaska-ettes,” a brilliant adaptation of a beloved classic into a charming, individual cupcake form. It wasn’t entirely my original idea, but finding the perfect recipe on Recipe Zaar (a fantastic resource when your cookbook collection is overflowing and time is short!) felt like discovering a hidden treasure.
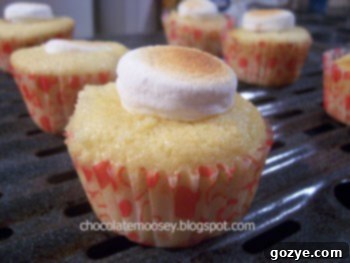
The beauty of the Baked Alaskaette lies in its clever fusion of textures and temperatures: a tender cupcake base, a creamy hidden core of ice cream, all crowned with a golden, toasted marshmallow topping. Traditionally, Baked Alaska features a meringue shell, but for the marshmallow-themed challenge, a generous half-marshmallow provided the ideal, fluffy, and perfectly toastable substitute. This recipe was not just a means to enter a contest; it was an invitation to transform a classic dessert into a playful, bite-sized delight, promising a unique experience that few others would dare to bake.
Embracing the Baked Alaskaette Concept: A Unique Dessert Experience
The classic Baked Alaska is a showstopper: a cake base topped with ice cream, enveloped in a cloud of meringue, and then briefly baked at high heat or torched until the meringue is beautifully browned and caramelized. The magic lies in the meringue’s insulating properties, which keep the ice cream perfectly frozen, even as the exterior gets toasted. Translating this grandeur into a cupcake format requires a delicate touch and a bit of ingenuity. Our “Baked Alaskaette” reimagines this by replacing the large cake with individual cupcakes, and the traditional meringue with a generous half of a marshmallow.
This substitution is not just a nod to the marshmallow theme but also offers a different textural experience. Meringue is crisp and airy; marshmallow is soft, chewy, and yields a delightful gooeyness when toasted. This makes for an incredibly satisfying contrast with the cool, smooth ice cream hidden within. Imagine biting into a fluffy cupcake, discovering a cold burst of your favorite ice cream, and finishing with the warm, slightly caramelized chew of toasted marshmallow. It’s a symphony of flavors and sensations designed to impress and delight.
Essential Ingredients for Your Marshmallow Masterpiece
Crafting these delectable Baked Alaskaette Cupcakes begins with a selection of fresh, high-quality ingredients. Each component plays a vital role in achieving the perfect balance of flavor and texture:
- Flour (1 cup): The foundation of our cupcake. All-purpose flour provides the necessary structure, ensuring a tender yet stable cake that can hold its shape and the ice cream filling.
- Sugar (1 cup): Sweetens the cupcake and contributes to its moistness and golden crust. Granulated sugar is ideal for a classic cupcake texture.
- Baking Powder (1 tsp): Our primary leavening agent, responsible for the cupcake’s light and airy crumb. Ensure your baking powder is fresh for optimal rise.
- Salt (1/4 tsp): A crucial flavor enhancer. Salt balances the sweetness and brings out the other flavors in the cupcake, preventing it from tasting flat.
- Egg (1 large): Acts as a binder, adding richness, moisture, and helping to create a stable emulsion in the batter. A room-temperature egg incorporates more easily.
- Heavy Whipping Cream (3/4 cup): This is where the cupcake gets its luxurious richness and moist texture. The high fat content contributes to a tender crumb. If you find yourself without heavy cream, a useful substitution I discovered is 3/4 cup milk combined with 2 tablespoons of melted butter. This mimics the fat content and richness fairly well, though the texture might be slightly lighter.
- Vanilla (1 tsp): Essential for a classic, aromatic flavor that complements both the cake and the marshmallow. Pure vanilla extract is always recommended for the best taste.
- Ice Cream (1 pint): The star of the hidden core! Choose a flavor that pairs well with vanilla and marshmallow. Vanilla bean, chocolate, strawberry, or even a coffee-flavored ice cream could be delightful. Ensure it’s firm enough to scoop but not rock-hard when you’re ready to fill.
- Marshmallows (12, cut in half crosswise): These are key for the “Baked Alaskaette” effect. Cutting them in half creates a flat surface to cap the ice cream and a more manageable size for toasting on top of the cupcake. Large, regular marshmallows work best.
Having all your ingredients measured and ready before you start (mise en place) will make the baking process smoother and more enjoyable, especially when working with temperature-sensitive elements like ice cream and marshmallows.
The Art of Baking Baked Alaskaette Cupcakes: Step-by-Step Perfection
Creating these delightful cupcakes is a process that blends standard baking techniques with precise timing, especially when it comes to the broiler. Follow these steps carefully for the best results:
1. Preparing Your Cupcake Base
- Preheat Oven & Prepare Pan: Begin by preheating your oven to 375°F (190°C). Line a 12-cup standard muffin tin with paper liners. This ensures easy removal and a clean presentation.
- Combine Dry Ingredients: In a medium-sized bowl, sift together the flour, sugar, baking powder, and salt. Sifting helps to eliminate lumps and ensures these ingredients are evenly distributed, contributing to a smooth batter and consistent rise.
- Whisk Wet Ingredients: In a separate, larger bowl, beat the egg and heavy whipping cream (or your milk and melted butter substitute) together until well combined. Stir in the vanilla extract.
- Combine Wet and Dry: Gradually add the dry ingredients to the wet ingredients, mixing on low speed with an electric mixer or by hand until just combined. Be careful not to overmix, as this can lead to tough cupcakes. A few small lumps are perfectly fine.
- Fill & Bake: Distribute the batter evenly among the prepared cupcake liners, filling each about two-thirds full. This allows room for the cupcakes to rise without overflowing. Bake for approximately 20 minutes, or until a toothpick inserted into the center of a cupcake comes out clean. The tops should be lightly golden and spring back when gently touched.
- Cool Completely: This step is critical! Once baked, remove the cupcakes from the oven and let them cool in the muffin tin for a few minutes before transferring them to a wire rack to cool completely. This can take an hour or even longer. Do not rush this process; warm cupcakes will melt the ice cream prematurely.
2. The Ice Cream Filling: A Chilly Surprise
- Prepare for Filling: Once the cupcakes are thoroughly cooled, it’s time for the delicious surprise. Using a small paring knife, a melon baller, or a cupcake corer, carefully cut a hole in the center of each cupcake. Be sure not to cut all the way through to the bottom. The goal is to create a well large enough to hold a generous scoop of ice cream but not so wide that the marshmallow half won’t completely cover it. The marshmallow will act as an insulator, helping to protect the ice cream during the broiling process.
- Spoon in Ice Cream: Spoon a small amount of your chosen ice cream into each hole. Gently press it down to ensure it fills the cavity without overflowing. Work quickly to prevent the ice cream from melting.
3. The Broiler Challenge: Perfect Toasted Marshmallows
This is arguably the most crucial and potentially tricky part of the recipe, as the original experience highlighted. Achieving perfectly toasted marshmallows without melting the ice cream requires precision and a hot broiler. Here’s how to navigate it:
- Preheat Your Broiler: Contrary to some general broiler advice (and my own initial confusion from a manual!), for this recipe, you absolutely need a hot broiler. Turn your broiler on to its highest setting and allow it to preheat for at least 5-10 minutes. This ensures a rapid, even toast. A cold broiler will only prolong the exposure time, leading to melted ice cream and soggy cupcakes. Place the oven rack in the upper third of the oven, typically 4-6 inches from the heating element.
- Cap with Marshmallows: Once your cupcakes are filled with ice cream, place a halved marshmallow (cut-side down, or up – whichever you prefer for browning) on top of each ice cream-filled cavity, ensuring it completely covers the ice cream. This creates a seal that helps insulate the ice cream from the broiler’s heat.
- Broil with Vigilance: Carefully place the cupcake pan under the preheated broiler. This is where you need to be extremely vigilant. Broil for precisely 30 seconds. Do not walk away! Marshmallows can go from perfectly golden to burnt in a matter of seconds. If your broiler isn’t quite hot enough, it might take a minute or two, but the goal is to get that golden-brown crust as quickly as possible. Watch for the marshmallows to puff up and turn a beautiful toasted brown. If your broiler heats unevenly, you might need to rotate the pan slightly.
- Serve Immediately: As soon as the marshmallows are perfectly toasted, remove the cupcakes from the broiler. These are best served immediately to enjoy the contrast of the warm, gooey marshmallow, the cold ice cream, and the fresh cupcake.
Troubleshooting the Broiler: Lessons Learned
My first attempt with the broiler was a learning curve. As mentioned, our manual stated not to preheat the broiler, which led to a prolonged broiling time of two minutes. The result? While the marshmallows eventually toasted, the extended heat exposure caused the ice cream inside to melt into the cupcake batter, creating a less-than-ideal cross-section. This experience underscored the absolute necessity of a properly preheated, intensely hot broiler. Think of it as a quick flash-fire to toast the marshmallow without penetrating the core. If your broiler takes longer than 30-60 seconds to toast, it likely isn’t hot enough, or your rack is too far from the heat source. Adjust accordingly for your next batch!
Tips for Success and Creative Variations
To ensure your Baked Alaskaette Cupcakes are always a triumph, consider these additional tips and ideas for customization:
- Ice Cream Flavors: Don’t limit yourself to vanilla! Experiment with chocolate, mint chip, coffee, strawberry, or even a fruit sorbet for a lighter twist. Just ensure the flavor complements your cupcake base and marshmallow.
- Cupcake Flavors: While a vanilla cupcake provides a perfect canvas, you could try chocolate, lemon, or even red velvet for a different base flavor.
- Mini Marshmallows: If you don’t have large marshmallows, you can arrange several mini marshmallows on top of the ice cream. They will melt together to form a cohesive topping.
- Garnish: A drizzle of chocolate syrup, a sprinkle of sprinkles, or a fresh berry can elevate the presentation even further.
- Prepare Ahead: You can bake and cool the cupcakes up to a day in advance. Store them in an airtight container at room temperature. Fill them with ice cream and top with marshmallows just before you plan to broil and serve.
- No Broiler? No Problem (Kind Of): While the broiler gives the best authentic toasted marshmallow flavor, if you absolutely cannot use one, a kitchen torch can achieve a similar effect. Simply torch the marshmallow tops until golden brown, ensuring you work quickly.
Serving and Storage Suggestions
Baked Alaskaette Cupcakes are at their absolute best when served immediately after broiling. The delightful contrast between the warm, gooey marshmallow and the cold, creamy ice cream is what makes this dessert so special. If you need to prepare them for a party, consider having the cupcakes baked and cooled, the ice cream scooped into small balls and frozen, and marshmallows halved. Assemble, broil, and serve in batches. Leftovers, though unlikely, can be stored in an airtight container in the freezer. However, the marshmallow texture will change upon thawing, becoming less gooey and more firm. It’s truly a dessert designed for instant gratification!
These Baked Alaskaette Cupcakes were my answer to the Cupcake Hero challenge, a unique and unforgettable marshmallow-themed treat. They combine classic dessert elegance with playful individual portions, making them perfect for any gathering or just a special treat. Don’t be intimidated by the broiler; with a little practice and vigilance, you’ll be creating marshmallow masterpieces in no time!

Baked Alaskaette Cupcakes
1 dozen
Experience the delightful fusion of a soft cupcake, a creamy ice cream center, and a perfectly toasted marshmallow topping with these unique Baked Alaskaette Cupcakes – a perfect treat for any occasion or challenge!
Ingredients
- 1 cup all-purpose flour
- 1 cup granulated sugar
- 1 tsp baking powder
- 1/4 tsp salt
- 1 large egg
- 3/4 cup heavy whipping cream (or 3/4 cup milk + 2 Tbsp melted butter)
- 1 tsp vanilla extract
- 1 pint of your favorite ice cream (vanilla, chocolate, or fruit flavors work wonderfully)
- 12 large marshmallows, cut in half crosswise
Instructions
- Preheat oven to 375°F (190°C). Line a 12-cup standard cupcake pan with paper liners.
- In a small bowl, sift together the flour, sugar, baking powder, and salt. In a separate bowl, beat the egg and heavy whipping cream (or milk + melted butter substitute) together. Stir in the vanilla extract. Gradually add the dry ingredients to the wet ingredients, beating thoroughly until just combined. Do not overmix.
- Fill each prepared cupcake liner two-thirds full with batter. Bake for 20 minutes, or until a toothpick inserted into the center of a cupcake comes out clean. Transfer cupcakes to a wire rack and cool completely for at least one hour before proceeding.
- Prepare for Broiling: Preheat your broiler to its highest setting, ensuring it’s hot and ready. Place an oven rack 4-6 inches from the heating element. Once cupcakes are completely cool, use a small paring knife or melon baller to carefully cut a hole in the middle of each cupcake, making sure not to go all the way to the bottom.
- Fill with Ice Cream: Spoon a small amount of ice cream into each hole, pressing it gently. Ensure the holes are not wider than the marshmallow halves, as the marshmallow needs to completely cover and insulate the ice cream.
- Add Marshmallows & Broil: Place a halved marshmallow on top of the ice cream-filled cavity of each cupcake. Carefully place the cupcake pan under the preheated broiler for exactly 30 seconds. Watch constantly as marshmallows toast very quickly. The marshmallows should puff up and become golden brown. (Note: If your broiler is less powerful, this might take up to 60 seconds, but aim for speed to prevent ice cream melting.)
- Serve Immediately: Remove from broiler and serve your Baked Alaskaette Cupcakes immediately to enjoy the delightful contrast of warm, toasted marshmallow and cold, creamy ice cream.
Did you make this recipe?
Let me know what you think! Rate the recipe above, leave a comment below, and/or share a photo on Instagram using #HITKrecipes
Source: Food.com
