Soft & Fluffy Homemade Crescent Rolls with Honey Butter: Your New Go-To Recipe
Imagine a basket of warm, tender, and incredibly fluffy rolls, pulled fresh from your oven, their golden-brown crust glistening with sweet honey butter. This isn’t a dream, and you won’t need a can opener! Our recipe for Homemade Crescent Rolls is designed to bring that delightful aroma and melt-in-your-mouth texture right into your kitchen. Say goodbye to store-bought canned dough and embrace the joy of baking these irresistible rolls from scratch. Perfect for your next family meal, a holiday gathering, or simply a cozy evening at home, these crescent rolls, served with our signature vanilla honey butter, are guaranteed to become a cherished family favorite.

For many years, my kitchen has been a sanctuary, a place where creativity meets comfort, often with my feline companion, J, supervising from his favorite spot on my lap. He’s always eager to sample whatever I’m crafting, a testament to his discerning palate (and perhaps a love for food that rivals my own!). This unique dining dynamic often inspires my approach to cooking, leading to a wonderful collection of small-batch recipes perfect for one or two. However, some weekends are meant for bigger, more communal meals, especially when my parents and brother gather. These are the precious opportunities to expand my culinary horizons, creating full feasts complete with an array of side dishes, knowing every bite will be savored and appreciated.
It’s during these cherished family gatherings that I find myself reaching for recipes like these glorious Homemade Crescent Rolls or my beloved small batch biscuits. These are the kinds of baked goods that are truly at their peak when fresh from the oven, their soft texture and delicate flavors best enjoyed immediately. While I occasionally indulge in the convenience of a fresh loaf from a local bakery for everyday meals, there’s an undeniable magic in kneading dough from scratch. It’s a therapeutic process that connects me to the ingredients, transforming simple flour and yeast into something truly extraordinary. Even if I’m not making the rolls themselves, you can bet I’m whipping up some special herb butter to accompany any bread on our table.
Traditionally, my small batch dinner rolls have been the perfect complement to comforting dishes like one pot lasagna soup or a creamy Tomato Mushroom Pasta. But with Easter on the horizon, I felt inspired to elevate our meal. I envisioned something a little more special, a touch more luxurious: warm Homemade Crescent Rolls, generously brushed with an exquisite vanilla honey butter. After all, what is a festive occasion, especially an Easter dinner for two, without the comforting presence of freshly baked bread?
You’re likely familiar with the convenience of canned crescent rolls – the satisfying pop of the can, the unrolling of the dough, and the quick bake. While convenient, they simply can’t compare to the homemade version. These honey butter crescent rolls are precisely that, but made entirely from scratch, offering a taste that’s a thousand times superior. Why? Because they’re fresh, infused with genuine care and attention, and crafted with simple, wholesome ingredients. As if their inherent deliciousness wasn’t enough, I’ve taken this recipe to the next level by slathering the dough with a delectable vanilla honey butter, complete with delicate specks of vanilla bean. Imagine presenting a warm basket of these soft, fluffy rolls, each one boasting a hint of sweetness and the subtle fragrance of vanilla. Once you experience this homemade delight, you’ll never consider buying canned dough again!
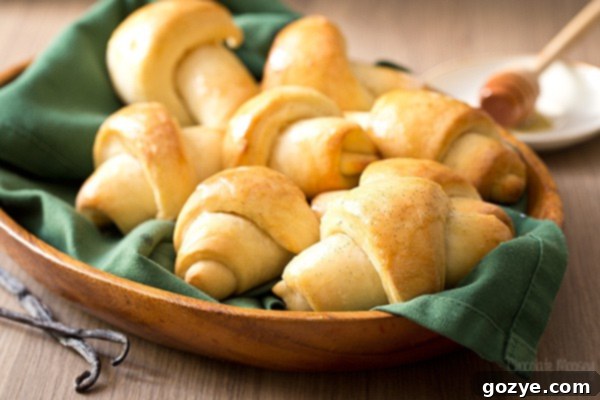
What Are Crescent Rolls?
Crescent rolls are a delightful type of yeast-leavened bread roll, famously named for their distinctive, curved shape. After being rolled and baked, these tender rolls resemble a beautiful crescent moon. Originating from European traditions, they’ve become a beloved staple on dinner tables across America, known for their soft, airy interior and inviting golden crust. Unlike some other enriched doughs, crescent rolls focus on a simple, yet incredibly satisfying, bread-like texture.
Are Crescent Rolls and Croissants the Same?
This is a common question, and the answer is a definitive no! While they share a similar shape and both are incredibly delicious, crescent rolls and croissants are distinct in their preparation, ingredients, and resulting texture.
- Crescent Rolls: These are primarily a yeast roll made from a soft, enriched bread dough. The process involves kneading the dough until it’s smooth and elastic, allowing it to rise, and then cutting it into triangles before rolling them up into the familiar crescent shape. Their texture is soft, fluffy, and bread-like, perfect for soaking up gravies or simply enjoyed with butter.
- Croissants: In contrast, croissants are a more intricate pastry made with a laminated (layered) dough. This means butter is folded into the dough multiple times, creating numerous thin, delicate layers, similar to puff pastry. This lamination process gives croissants their characteristic flaky, buttery, and shatteringly crisp exterior, with an airy, honeycomb interior. They are typically richer and have a more pronounced buttery flavor than crescent rolls.

Essential Ingredients for Your Homemade Crescent Rolls
Crafting the perfect crescent roll begins with understanding the role each ingredient plays. Here’s a breakdown of what you’ll need and why it’s important for achieving that irresistibly soft and fluffy texture:
- Milk: We highly recommend using whole milk. The higher fat content in whole milk is crucial as it contributes significantly to the tenderness and richness of your dough, resulting in a more luxurious and soft roll. Avoid using low-fat or skim milk, as they will yield a less tender product.
- Butter: Beyond adding a rich, delicious flavor, butter is essential for creating those lovely air pockets within the dough. As the butter melts during baking, it releases steam, which helps the rolls puff up and contributes to their incredibly soft, fluffy texture.
- Flour: All-purpose flour is the structural backbone of your rolls. It forms gluten, a protein network that gives the dough its elasticity and strength, allowing it to trap gases produced by the yeast and rise beautifully.
- Sugar: This isn’t just for sweetness! Sugar acts as vital “food” for the yeast, helping it activate and produce the carbon dioxide needed for rising. It also plays a key role in the Maillard reaction during baking, contributing to that desirable golden-brown crust.
- Quick Rising Yeast (Instant Yeast): Pay attention to the type of yeast! Quick-rising or instant yeast is a game-changer for this recipe. Unlike active dry yeast, quick-rising yeast can be mixed directly with the dry ingredients and typically requires only one rise, significantly cutting down on overall preparation time without sacrificing quality.
- Salt: Far from just a flavor enhancer, salt is a crucial ingredient in yeast doughs. It not only prevents your rolls from tasting bland but also helps to tighten and strengthen the gluten strands, which makes the dough more manageable and results in a better crumb structure.
- Egg: The addition of a large egg enriches the dough, providing extra fat from the yolk and moisture from the white. This contributes to a lighter, softer, and more tender bread, enhancing both flavor and texture.
- Vanilla: Don’t skip the vanilla! While often associated with sweet dishes, vanilla can surprisingly elevate savory and semi-savory baked goods. In this recipe, a touch of vanilla adds depth and warmth, perfectly balancing the sweetness of the honey butter and creating a truly unique flavor profile.
- Honey: A key component of our irresistible honey butter glaze, honey provides a natural, delicate sweetness and a beautiful sheen when brushed onto the warm rolls.

Step-by-Step: How to Make Homemade Crescent Rolls
Baking homemade crescent rolls is a rewarding process. Follow these detailed steps to achieve perfect, soft, and fluffy results every time:
- Prepare the Warm Milk and Butter Mixture: In a small saucepan or microwave-safe bowl, whisk together the milk and melted butter. Gently heat this mixture until its temperature registers between 120°F to 130°F (49°C to 54°C). This temperature is crucial: too cold, and the yeast won’t activate properly; too hot, and it will kill the yeast, preventing your dough from rising. A kitchen thermometer is highly recommended for accuracy.
- Combine Dry Ingredients and First Wet Mix: In a large mixing bowl (or the bowl of a stand mixer fitted with the paddle attachment), combine half of the all-purpose flour (1 ½ cups), granulated sugar, quick-rising yeast, and salt. Mix briefly to combine. Then, on a low speed if using a mixer, gradually beat in the warm milk mixture and the room-temperature egg until all the dry ingredients are moistened and a shaggy dough begins to form.
- Incorporate Remaining Flour: Continue beating on low speed, gradually adding the remaining 1 ¼ cups of flour. Beat until a soft dough forms. The dough should be slightly sticky, but manageable. If it feels excessively sticky and difficult to work with, add the remaining ¼ cup of flour, one tablespoon at a time, until it reaches the desired consistency – soft but not excessively tacky.
- Knead and Rest the Dough: Turn the dough out onto a lightly floured surface. Knead the dough for approximately 6-8 minutes, or until it becomes smooth, elastic, and springs back when gently poked. Proper kneading develops the gluten, which is essential for the rolls’ texture. Once kneaded, cover the dough with a clean tea towel and let it rest for 10 minutes. This short rest allows the gluten to relax, making the dough easier to roll.
- Shape the Crescent Rolls: After the rest, roll out the dough into a large, even 12-inch circle. Using a sharp knife or pizza cutter, cut the circle into 12 equal triangles, like spokes on a wheel. To form each crescent, start from the wide end of one triangle and gently roll it towards the point. As you roll, lightly press the point into the dough to seal it. Place the rolled crescent, point-side down, onto a baking sheet lined with parchment paper, and gently curve the ends to form the classic crescent shape. Repeat with the remaining dough triangles.
- Second Rise: Cover the shaped rolls loosely with a clean tea towel or plastic wrap. Place them in a warm, draft-free spot and let them rise until they have nearly doubled in size, which typically takes about 30 minutes. This second rise (also known as proofing) is critical for achieving a light and airy texture.
- Bake to Golden Perfection: While the rolls are rising, preheat your oven to 400°F (200°C). Once the oven is ready and the rolls have risen, bake them for 10-12 minutes, or until they are beautifully golden brown on top and cooked through. Keep an eye on them, as oven temperatures can vary.
- Cool and Brush with Honey Butter: Remove the baked rolls from the oven and let them cool on the baking sheet for about 15 minutes. While they’re cooling, prepare the vanilla honey butter by whisking together the melted butter, honey, vanilla bean seeds (or vanilla extract), and a pinch of salt. Generously brush this fragrant honey butter over the warm rolls. Serve immediately for the best experience!
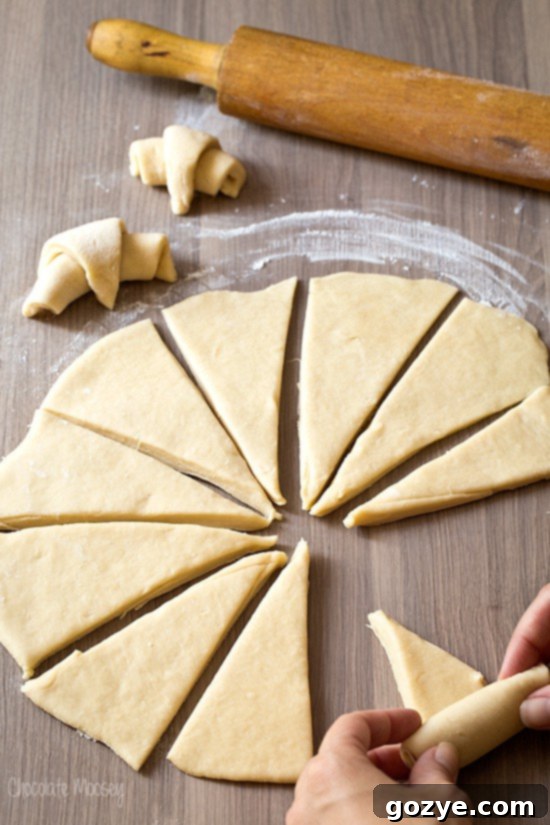
Mastering the Crescent Roll Shape: A Simple Guide
The distinctive crescent shape of these rolls might look sophisticated, but I promise you, it’s incredibly simple to achieve. It adds a touch of elegance to your finished product without any complicated folding techniques. Here’s how to do it effortlessly:
- Roll Out Your Dough: After your dough has rested, gently roll it out on a lightly floured surface. Aim for a perfect 12-inch circle. Precision isn’t strictly necessary, but a good circle makes cutting easier.
- Cut into Triangles: Using a sharp knife or a pizza cutter, slice the dough circle into 12 even triangles. Start by cutting it in half, then quarters, then each quarter into three equal wedges.
- The Rolling Technique: Take one triangle. Begin rolling it from the wide end, gently but firmly, towards the pointed tip. As you roll, ensure the point is slightly tucked and pressed into the roll to seal it in place. This prevents it from unrolling during baking.
- Curve for the Crescent: Once rolled, place the dough seam-side down on your prepared baking sheet. Gently curve the ends inwards to create that iconic crescent moon shape. Don’t worry if they’re not perfectly uniform; homemade charm is part of the appeal!
- Repeat and Rise: Continue this process with the remaining dough triangles, placing them a couple of inches apart on the baking sheet to allow for rising.
Can You Freeze Homemade Crescent Rolls? Yes!
While I often create small-batch recipes, the inclusion of an egg in this crescent roll dough means it’s best to stick to the full recipe for optimal texture. However, if a dozen rolls seem like too many to enjoy in one sitting, I have fantastic news – this recipe for crescent rolls freezes beautifully! This makes them perfect for meal prepping or having fresh-baked bread on demand.
You have two excellent options for freezing your homemade crescent rolls:
- Freeze the Dough Before Baking: This method allows you to have fresh-from-the-oven rolls with minimal effort on the day you want to serve them. Simply shape the rolls as instructed, but skip the final rise and baking.
- Freeze Fully Baked Rolls (Before Brushing with Honey Butter): If you prefer to bake them all at once, you can freeze the rolls after they’ve cooled completely, but before applying the honey butter. This makes for super quick reheating.
How to Freeze Crescent Rolls:
Regardless of whether you choose to freeze them before or after baking, the initial freezing method is the same:
- Flash Freeze: Arrange your unbaked (shaped) or fully baked (and cooled) rolls in a single layer on a baking tray lined with parchment paper. Ensure they are not touching each other. Place the tray in the freezer until the rolls are firm, typically about 1 hour. This “flash freezing” step is crucial as it prevents them from sticking together in a large clump when stored.
- Store: Once firm, transfer the frozen rolls to a freezer-safe plastic bag or an airtight container. Remove as much air as possible to prevent freezer burn. Label the bag with the date and contents.
- Freezer Life: Your homemade crescent rolls can be frozen for up to 2 months.
To Bake/Reheat Frozen Rolls:
- For Unbaked Frozen Rolls: Transfer the frozen rolls to a lightly greased baking sheet. Cover them loosely and let them thaw and rise in a warm place until nearly doubled in size (this may take 2-4 hours, depending on your kitchen temperature). Once risen, bake according to the recipe instructions (400°F for 10-12 minutes).
- For Baked Frozen Rolls: You can reheat frozen baked rolls directly from the freezer. Place them on a baking sheet and warm in a preheated oven at 300-325°F (150-160°C) for about 10-15 minutes, or until heated through and soft. Then, apply the honey butter.

What To Serve With Homemade Crescent Rolls
Now that you have a basket of freshly baked, aromatic honey butter crescent rolls, the next delightful question is: what to pair them with? Their versatile, slightly sweet, and utterly comforting nature makes them a fantastic accompaniment to a wide variety of meals. Here are some of my favorite recipes that truly shine when served alongside these incredible rolls:
- Lasagna For Two: The rich, savory flavors of a classic lasagna, with its layers of pasta, meat sauce, and melted cheese, are beautifully complemented by the light, slightly sweet crescent rolls, perfect for soaking up any extra sauce.
- Honey Glazed Ham Steak Dinner: The subtle sweetness of the crescent rolls echoes the honey glaze on the ham, creating a harmonious and balanced meal. Their soft texture also provides a lovely contrast to the hearty ham.
- Maple Roasted Chicken Quarters: The savory depth of roasted chicken, especially with a sweet and smoky maple glaze, finds a perfect partner in these fluffy rolls. They are ideal for sopping up any delicious pan juices.
- Hearty Soups and Stews: Think creamy tomato soup, a rich beef stew, or a comforting chicken noodle soup. Crescent rolls are excellent for dipping, adding substance and comfort to any bowl.
- Holiday Feasts: Beyond Easter, these rolls are a must-have for Thanksgiving, Christmas, or any special occasion where a beautiful bread basket is desired. They pair wonderfully with turkey, roasts, and all the traditional trimmings.
- Breakfast or Brunch: Don’t limit them to dinner! These rolls are fantastic with scrambled eggs, bacon, or even just a little extra jam for a delightful breakfast or brunch treat.
Tips for Success & Common Questions
To ensure your homemade crescent rolls turn out perfect every single time, here are a few extra tips and answers to common questions:
Kitchen Equipment That Helps:
- Kitchen Thermometer: Absolutely essential for ensuring your milk mixture is at the correct temperature for yeast activation.
- Stand Mixer: While you can knead by hand, a stand mixer with a dough hook makes the kneading process effortless and consistent.
- Parchment Paper: Prevents sticking and makes cleanup a breeze.
Troubleshooting Common Issues:
- Rolls Didn’t Rise: This is usually due to inactive yeast. Ensure your milk temperature is correct (120-130°F). If your yeast is old, it might have lost its potency.
- Dough Too Sticky/Dry: Dough consistency can vary slightly depending on humidity and how packed your flour is. Adjust with small additions of flour (if too sticky) or a tiny bit more milk (if too dry) during kneading until it’s soft and elastic.
- Rolls Are Dense: This can be caused by under-proofing (not letting them rise enough) or over-kneading. Ensure the dough is properly kneaded until elastic, and give them ample time to rise until nearly doubled.
Variations to Try:
- Garlic Herb Crescent Rolls: Omit the vanilla and honey from the butter. Instead, mix melted butter with minced garlic, chopped fresh parsley, and a pinch of dried oregano or Italian seasoning. Brush over warm rolls for a savory twist.
- Cinnamon Sugar Rolls: Before rolling the triangles, spread a thin layer of softened butter and a sprinkle of cinnamon sugar over the entire dough circle. Roll up as usual and brush with plain melted butter after baking.
- Orange Glaze: For a citrusy finish, whisk powdered sugar with a few tablespoons of orange juice and a tiny bit of orange zest, then drizzle over cooled rolls.
Storage & Leftovers:
Homemade crescent rolls are undoubtedly best enjoyed the day they are baked. However, if you have leftovers, store them in an airtight container at room temperature for up to 2 days. To refresh them, a quick warm-up in the microwave (10-15 seconds) or a few minutes in a low oven (300°F) will help restore some of their initial softness.

Homemade Crescent Rolls with Vanilla Honey Butter
1 dozen rolls
1 hour
10-12 minutes
1 hour 10-15 minutes
Experience the unparalleled taste of freshly baked, soft, and fluffy Homemade Crescent Rolls! This recipe eliminates the need for canned dough, offering a truly superior bread experience, especially when brushed with our delightful vanilla honey butter. Perfect for any meal, they’re sure to impress.
Ingredients
- 1/2 cup whole milk (do not substitute low fat or skim)
- 1/4 cup (2 ounces or 4 tablespoons) unsalted butter, melted
- 2 + 3/4 cups – 3 cups all-purpose flour
- 1/4 cup granulated sugar
- 1 + 1/2 teaspoons quick rising/instant yeast (not active dry)
- 1 teaspoon table salt
- 1 large egg, room temperature
For the Vanilla Honey Butter
- 1 tablespoon unsalted butter, melted
- 2 teaspoons honey
- Seeds from half a vanilla bean (or use 1/2 teaspoon vanilla extract)
- Pinch of salt
Instructions
- Whisk together the milk and melted butter and heat until it’s between 120°F – 130°F (49-54°C). Use a kitchen thermometer for accuracy.
- In a large bowl (with the paddle attachment if using a stand mixer), combine 1 + 1/2 cups flour, sugar, yeast, and salt. On low speed, beat in the warm milk mixture and egg until just moistened.
- Continuing on low speed, gradually beat in remaining 1 + 1/4 cups flour to make a soft dough. The dough will be slightly sticky; if it’s too sticky to handle, beat in the remaining 1/4 cup flour, one tablespoon at a time, until manageable.
- On a lightly floured surface, knead the dough until smooth and elastic, about 6-8 minutes. Cover with a tea towel and let rest for 10 minutes.
- Roll out the dough to form a 12-inch circle. Cut the dough into 12 triangles. Starting with the wide end of one triangle, roll up the dough, pressing the point into the dough to seal. Place the roll point side down on the baking sheet and curve to form a crescent shape. Repeat with the remaining dough.
- Cover the shaped rolls and let them rise in a warm, draft-free space until nearly doubled in size, about 30 minutes.
- Preheat oven to 400°F (200°C). Line a baking sheet with parchment paper.
- Bake for 10-12 minutes or until golden brown. Cool for 15 minutes on the baking sheet.
- While the rolls are cooling, make the vanilla honey butter: Whisk together the melted butter, honey, vanilla bean seeds (or vanilla extract), and a pinch of salt. Brush generously on top of the warm rolls.
Homemade crescent rolls are best enjoyed the same day they’re made. Store any leftovers in an airtight container for up to 2 days at room temperature.
Notes
- Enjoyed this recipe? You might also love my Small Batch Honey Butter Dinner Rolls for a simpler option.
- To Freeze Crescent Rolls: For unbaked or baked rolls, arrange them in a single layer on a parchment-lined tray and freeze until firm (about 1 hour). Transfer to a freezer-safe bag and freeze for up to 2 months. Thaw unbaked rolls before rising and baking; reheat baked rolls directly from frozen.
- For a Savory Twist: Omit vanilla and honey from the butter. Instead, mix melted butter with minced garlic, chopped fresh parsley, and a pinch of dried Italian seasoning to brush over warm rolls.
Did you make this recipe?
Let me know what you think! Rate the recipe above, leave a comment below, and/or share a photo on Instagram using #HITKrecipes
Source: Adapted from Taste Of Home
First published October 26, 2015, this recipe has been updated and enhanced for even better results and a more comprehensive baking experience.
